- Index
 ImageMagick Examples Preface and Index
 Resizing Images
- Other Specialised Resize Operators
- Specific Problems using Resize
- Resize Artifacts - How Good is IM Resize?
-
Blocking,
Ringing,
Aliasing,
Blurring
- Resize Filters
- Interpolated Filters
Point,
Box,
Triangle,
Hermite
Other Interpolation Filters
- Gaussian Blurring Filter
-
Gaussian,
Quadratic,
Cubic
Other Gaussian-like Filters
- Filter Blur Setting
- Filter Support Setting
- Windowed Sinc/Bessel Filters
-
Lanczos,
Hanning,
Hamming,
Blackman,
Blackman,
Kaiser,
Bartlett,
Parzen,
Welsh
- Lobes Filter Support Setting
- Lagrange Filter
- Cubic Filters
-
Cubic,
Hermite,
Catrom,
Mitchell
Cubic BC Settings
- Expert Filter Settings
- Summary of Resize filters
- Filter Comparison, and the
Best Filter?
We we look at enlarging and reducing images in various ways. The Image
remains intact and whole, but individual points of color merged or expanded to
use up a smaller/larger canvas area.
Note that while this is related to the resolution of an image (number of
pixels per real world length), that is more a product of how the image is
eventually used, and not a true concern of Direct Image Processing.
Resizing Images
The more obvious and common way to change the size of an image is to resize
or scale an image. The content of the image is enlarged or more commonly
shrink to fit the desired size. But while the actual image pixels and colors
are modified, the content represented by the image is essentially left
unchanged.
However resizing images can be a tricky matter. Their are a lot of options
that you need to consider, and to give you the maximum scope of control
ImageMagick provides you with a multitude of options, resize operations
styles, and ways of specifying the new size of the image.
The first and foremost thing you should consider when specifying a image to
resize is...
Do you really want to modify the image?
Resizing will cause drastic changes to the content of the image, and avoiding
or minimizing the change should be of greatest importance. Perhaps just a
slight
Shave of the edges, or a more general
Crop of the image will produce a better and more
desirable outcome than a wholesale resize of the image. It generally will
look better.
The resize operator has been very carefully designed to try to produce the best
possible result for real world images. That is not to say you can't use it for
diagrams, or line drawings, though for that type of image you may need to use
some of the more advanced options we'll look at later.
The resize operator is given an area into which the image should be fitted.
This area is
not the final size of the image (unless a '!' flag is
given) but the maximum size for the final image. IM tries to preserve the
aspect ratio of the image more than the final actual size for the image. That
is a circle in the input image will remain a circle in the output image.
So let me be clear...
Resize will fit the image into the requested size.
It does NOT fill, the requested box size.
For example here I attempt to fit two source images, one larger image and one
smaller image into a square box 64x64 pixels in size.
  convert dragon.gif    -resize 64x64  resize_dragon.gif
  convert terminal.gif  -resize 64x64  resize_terminal.gif
|
![[IM Output]](dragon.gif)

![[IM Output]](resize_dragon.gif)

![[IM Output]](terminal.gif)
![[IM Output]](resize_terminal.gif)
As you can see a 64x64 square image was
NOT produced by "
-resize". In fact the images
were only enlarged or reduced enough so as to best fit into the given size.
Ignore Aspect Ratio ('!' flag)
If you want you can force "
-resize" to ignore the aspect ratio and distort the image so it
always generates an image exactly the size specified. This is done by adding
the character '
!' to the size. Unfortunately this character is
also sometimes used by various UNIX and DOS command line shells. So you may
have to escape the character somehow to preserve it.
  convert dragon.gif    -resize 64x64\!  exact_dragon.gif
  convert terminal.gif  -resize 64x64\!  exact_terminal.gif
|
![[IM Output]](exact_dragon.gif)
![[IM Output]](exact_terminal.gif)
Only Shrink Larger Images ('>' flag)
Another commonly used option is to restrict IM so that it will only shrink
images to fit into the size given. Never enlarge. This is the
'
>' resize option. Think of it only applying the resize to
images 'greater than' the size given (its a little counter intuitive).
  convert dragon.gif    -resize 64x64\>  shrink_dragon.gif
  convert terminal.gif  -resize 64x64\>  shrink_terminal.gif
|
![[IM Output]](shrink_dragon.gif)
![[IM Output]](shrink_terminal.gif)
This option is often very important for saving disk space of image, or in
thumbnail generation, as enlarging images generally not desirable as it tend
to produce 'fuzzy' enlargements.
 |
The Only Shrink Flag ('>' flag) is a special character in
Window batch scripts and you will need to escape that character, using
'^>', or it will not work. See Windows Batch Scripts API Notes for this and other windowing
particularities.
|
Only Enlarge Smaller Images ('<' flag)
The inverse to the previous flag is '
<', which will only
enlarges images that are smaller than the given size, is rarely used.
The most notable use is with a argument such as '
1x1<'. This
resize argument will never actually resize any image. In other words it's a
no-op, which will allow you to short circuit a resize operation in programs
and scripts which always uses "
-resize". Other than that you probably do not actually want to
use this feature.
One such example of using this 'short circuit' argument is for the "
-geometry" setting of
"
montage". See
Montage and
Geometry, caution needed for more details.
Fill Area Flag ('^' flag)
As of IM v6.3.8-3 IM now has a new geometry option flag '
^' which
is used to resize the image based on the smallest fitting dimension. That
is the image is resized to completely fill (and even overflow) the pixel area
given.
  convert dragon.gif    -resize 64x64^  fill_dragon.gif
  convert terminal.gif  -resize 64x64^  fill_terminal.gif
|
![[IM Output]](fill_dragon.gif)
![[IM Output]](fill_terminal.gif)
As it stands this option does not seem very useful, but when combined with
either a centered (or uncentered) "
-crop" or "
-extent" to remove the excess parts of the image, you can fit the
image so as to best fill the area specified. Both the resize and the final
image size arguments should be the same values.
Though the "
-crop" is most
logical, it may require a extra "
+repage" to remove virtual canvas layering information See
Cutting and Bordering for more information.
  convert dragon.gif      -resize 64x64^ \
          -gravity center -extent 64x64  fill_crop_dragon.gif
  convert terminal.gif    -resize 64x64^ \
          -gravity center -extent 64x64  fill_crop_terminal.gif
|
![[IM Output]](fill_crop_dragon.gif)
![[IM Output]](fill_crop_terminal.gif)
You can use either "
-crop"
or "
-extent" though the
former is most logical, it may require a extra "
+repage" to remove virtual
canvas layering information.
|
Remember this is a VERY late addition to IM so ensure your version is IM
v6.3.8-3 or greater before you make use of it. Otherwise use the older Resizing to Fill a Given Space technique below.
|
|
The Fill Area Flag ('^' flag) is a special character in Window
batch scripts and you will need to escape that character by doubling it.
For example '^^', or it will not work. See Windows Batch Scripts API Notes for this and
other windowing particularities.
|
Percentage Resize ('%' flag)
Adding a percent sign, '%', to the "
-resize" argument causes resize to scale the image by the amount
specified.
  convert dragon.gif    -resize 50%  half_dragon.gif
  convert terminal.gif  -resize 50%  half_terminal.gif
|
![[IM Output]](half_dragon.gif)
![[IM Output]](half_terminal.gif)
Be warned however that the final pixel size of the image will be rounded to
the nearest integer. That is you can not generate a half pixel image.
|
The Percentage Resize Flag ('%' flag) is a special character in
Window batch scripts and you will need to escape that character by doubling
it. For example '%%', or it will not work. See Windows Batch Scripts API Notes for this and
other windowing particularities.
|
Resize to a Pixel Count Limit ('@' flag)
There is one final "
-resize" option flag. The "at" symbol '
@', will
resize an image to contain at most the the given number of pixels. This can
be used for example to make a collection of images of all different sizes
roughly the same size. For example here we resize both our images to a rough
64x64 size, or 4096 pixels in size.
  convert dragon.gif    -resize 4096@  pixel_dragon.gif
  convert terminal.gif  -resize 4096@  pixel_terminal.gif
|
![[IM Output]](pixel_dragon.gif)
![[IM Output]](pixel_terminal.gif)
Note that the final image size is not limited to 64 pixels in height or width,
but will have an area that is as close to this size (or slightly smaller) as
IM can manage it.
 |
All these 'flag' options '!', '<',
'>', '^', '%', and
'@' are just on/off switches for the "-resize" operator. Just the
characters presence (or absence) in the resize argument is what matters, not
their position. They can appear at the start or end of the argument, or
before or after individual numbers (though not in the middle of a number).
That is '%50' has exactly the same effect as '50%'
though the latter is preferred for readability. Also '50%x30'
actually means '50%x30%' and NOT 50% width and 30 pixel high as
you might think.
This is the case for all IM arguments using a 'geometry' style ('WxH' or
'+X+Y') of argument. However offsets such as '+X+Y' are never treated as
a percentage.
|
Resize During Image Read
The resize operator can also be applied to images immediately after being
read, before it is added to the current image sequence and the next image is
read. That way a minimal amount of memory is needed to read in a lot of
images. See
Image Read Modifiers for more
details.
For example...
  convert dragon.gif'[64x64]'    read_dragon.gif
  convert terminal.gif'[64x64]'  read_terminal.gif
|
The only problem with this technique is that no special resize options can be
used, during the image read process.
|
Resize and transparency was a problem for ImageMagick before v6.2.4
producing a black halo effect around light colored objects on transparency.
This was researched and finally fixed from that version onward. For more
detail of this old bug see Resize Halo
Bug
|
Other Resize Operators
Geometry
- Resize just the last image
Geometry is a very special option. The operator behaves slightly differently
in every IM command, and often in special and magical ways. The reasons for
this is mostly due to legacy use and should be avoided if at all possible.
First in "display" it is used to size and position the window
of the image being displayed. This was its original usage and meaning when IM
was first started. It was from this its other 'resize' capabilities came
about.
For "montage" "-geometry" is a setting that is
saved until all the arguments have been read in. At this point it then
defines the final tile (cell) size (or leaves it up to "montage"
to work out) while the position arguments are used to specify the space
surrounding the tile cells. See Montage
Control Settings.
In "
composite", "
-geometry" is also saved until
the end of arguments have been reached. Then it is used to resize and
position the overlay image (the first image given) before it is overlaid onto
the background image (the second image). For example see
Composite Multiple Images.
As you can see it is used as a 'setting' in most IM commands, but in
"
convert" "
-geometry" it is both a special image resizing operator and a
positioning setting.
What it does is to "
-resize" just the
last image in the current image sequence.
This is the
only image processing operator that is designed
specifically to effect just the one image (the last one), in the current image
sequence.
To complicate this special option further, the positional parts of the
"
-geometry" option is
saved by "
convert" command, just as it is in "
composite". That is, any position is
preserved for later use by the "
-composite", to position the 'overlay' image, (the second last
image in the current image sequence) over the 'background' image (the first
image in the image sequence).
For this reason, you should limit the use of "
-geometry" in
"
convert" commands to just before a "
-composite" or "
-layers composite" operations.
To summarize, this operator is only really useful after reading or creating a
second image, just before you perform some type of
Alpha Composition to process with those
images.
For practical examples of using "
-geometry" to resize/position images see
Compositing Multiple Images.
Thumbnail
- Resize with profile stripping
The "-thumbnail"
operator is a variation of "-resize" designed specifically for shrinking very very large
images to small thumbnails.
First it uses "-strip" to
remove all profile and other fluff from the image. It the uses "-sample" to shrink the image down
to 5 times the final height. Finally it does a normal "-resize" to reduce the image to
its final size.
All this is to basically speed up thumbnail generation from very large files.
However for thumbnails of JPEG images, you can limit the size of the image
read in from disk using the "-size" setting, so the extra speed improvement is rarely needed
for JPEG in thumbnail generation. But it is still useful for other image
formats, such as TIFF, or for its profile stripping ability. As such it is
still the recommended way to resize images for thumbnail creation.
Magnify
- double image size
The "-magnify" option
just doubles the size of an image using the "-resize" operator. Plain an
simple. It is rarely used.
|
A "Minify()" function is also often available in API's that halves the size
of images in the same way as the "Magnify()" function of those API's.
However "-minify" is not available from the command line API,
at least not at the time of writing.
|
Resample
- Changing an images resolution
Just as in the previous alternative resize operators, "-resample" is also a simple
wrapper around the normal "-resize" operator.
Its purpose however is to adjust the number of pixels in an image so that when
displayed at the given Resolution or Density
the image will still look the same size in real world terms. That is the
given image is enlarged or shrunk, in terms of the number of pixels, while the
image size in real world units will remain the same.
It is meant to be used for images that was read in from, or will be written
out to, a program or device of a particular resolution or density. This is
especially important for adjusting an image to fit a specific hardware output
device, whether it is a display, or printer, or a postscript or PDF image
format of a specific resolution. Just remember the real world size of the
image does not change, only its resolution and of course the number of pixels
used to represent the image.
For example, suppose you had an image that you scanned at a 300dpi (dots per
inch). The image was saved with this resolution (density) or when you read it
into IM, you specified it as a 300dpi image (using "
-density"). Now you decide to
display it on a screen that has a resolution of 90dpi, so you do a
"
-resample 90". IM will now resize the image by 90/300 or to 30%
of the images original size and set the images new density to 90dpi. The
image is now smaller in terms of the number of pixels used, but if displayed
on a 90dpi display will appear at the same physical size as the original image
you scanned. That is, it now has a resolution appropriate for a 90dpi
display, so it will be displayed to the user at its original real world size.
A "
-units" setting (with
arguments '
PixelsPerInch' or '
PixelsPerCentimeter')
may be required in some situations to get this operator to work correctly.
This is setting can also be important for output to Postscript and PDF image
file formats.
Note that only a small number of image file formats (such as JPEG, PNG, and
TIFF) are capable of storing the image resolution or density with the image
data.
For formats which do not support an image resolution, or which are
multi-resolution (vector based) image formats, the original resolution of the
image must be specified via the "
-density" attribute (see
Density
Image Meta-data) before being read in. If no density attribute has been
set IM will assume it has a default density of 72dpi. Setting the density
AFTER reading such an image will only effect its output resolution, and not
effect its final size in terms of pixels.
Sample
- Resize by row/column replication/deleting
The "-sample" resize
operator is the fastest resize operator, especially in large scale image
reduction. In fact it is also even faster than the previous "-scale" operator.
When enlarging or magnifying an image, they both do pixel replication to
generate rectangular 'blocks' of pixel colors. However when shrinking an image
"-sample" just simply
deletes pixels.
Because whole rows and columns of pixels are simply removed, "-sample" will generate now new or
additional colors. This fact can be important for some image processing
techniques such as resizing GIF animations.
However directly deleting pixel rows and columns can result in rather horrible
results, especially for images containing with thin lines.
For example, here I draw a line but then reduce the image size resulting in
only a line of dots. This is a typical effect of image sampling.
  convert -size 150x60 xc: -draw 'line 0,59 149,0' line_orig.gif
  convert line_orig.gif  -sample 50x20  line_sample.gif
|
![[IM Output]](line_orig.gif)
![[IM Output]](line_sample.gif)
Scale
- Minify with pixel averaging
The "-scale" resize
operator is a simplified, faster form of the resize command.
When enlarging an image, the pixels in the image is replicated to form a
large rectangular blocks of color. Which is great for showing a clean
unblurred magnification of an image.
For example here is a magnified view of one of the built-in tile patterns...
convert -size 8x8 pattern:CrossHatch30 -scale 1000% scale_crosshatch.gif
| |
![[IM Output]](scale_crosshatch.gif)
|
Generally single percentage that is a multiple of 100% is used for the image
enlargement so as to ensure all pixels are enlarged by the same amount,
otherwise you can have different sizes pixel rows and columns producing large
scale Moiré pattern.
For example here I badly scaled a smooth looking '50% gray checks' pattern,
using a size that was not a multiple of the original images size.
  convert pattern:gray50 scale_gray_norm.gif
  convert pattern:gray50 -scale 36 scale_gray_mag.gif
| |
![[IM Output]](scale_gray_norm.gif)

![[IM Output]](scale_gray_mag.gif)
|
When shrinking images neighbouring pixels are averaged together to produce a
new colored pixel. For example scaling an image to 50% of its original size
will effectively average together blocks of 4 pixels to create a new pixel
(assuming the image size is a multiple of 2 as well).
Caution is advised however as a scale reduced image can also generate
Moiré patterns, unless a the new image is an exact integer reduction
('binning'), which also requires the original image size to be some exact
multiple of that same integer.
Also a real-world photograph that has bee heavily minified using "
-scale" tends to look overlay
sharp, with aliasing ('staircase') effects along sharp edges.
Finally, Cristy reports that the algorithm is designed to loop over rows of
pixels then columns, which is inverted to that of "
-resize". This may allow
"
-scale" to handle a "
mpc:" disk cached image better.
While this image resize operator is completely separate to the "
-resize" operator to make it
faster, the "
-resize"
operator can generate the same results by using a '
Box'
Resize Filter (see below).
|
It was recentally (IM v6.4.7) it was discovered that "-scale" still contained the old
Resize Halo Bug. This has been
reported.
|
The pixel averaging of "
-scale" allows to generate 'pixelated' images you typically see
used for hiding faces, or 'naughty' parts of images. You basically reduce the
size of the image to average the pixels, then enlarge again back to the images
original size.
convert rose: -scale 25% -scale 70x46 rose_pixelated.gif
|
![[IM Output]](rose.gif)
![[IM Output]](rose_pixelated.gif)
You can use a mask to combine the above pixelated image with the original
image, so as to 'hide' a much smaller 'naughty' bit present in the original
image. See the
Protect Someones Anonymity
example for a demonstration of using this technique.
Adaptive Resize
- Small resizes without blurring
The "-adaptive-resize" operator uses the special Mesh Interpolation method to resize images.
For example here I resize a simple line, using first a normal "
-resize", then again using
"
-adaptive-resize"
  convert -size 50x50 xc: -draw 'line 0,49 49,0' line_orig2.gif
  convert line_orig2.gif           -resize 80x80  line_resize.gif
  convert line_orig2.gif  -adaptive-resize 80x80  line_adaptive.gif
|
![[IM Output]](line_orig2.gif)
![[IM Output]](line_resize.gif)
![[IM Output]](line_adaptive.gif)
A better example needed - can you help?
Basically this avoids the normal blurring that the "
-resize" operator can produce
with sharp color changes. This works well for slight image size adjustments or
magnification, but will effectively produce aliasing, and Moiré
patterns in shrinking images by more than 50%.
These effects was specific noted by
dognose in a
topic on the IM
Forums.
I've noticed that it can be significantly faster, up to twice as
fast on big resizes. I've also noticed that the resulting image can
be a lot different. It seems that adaptive-resize makes the new
image much sharper than regular resize.
For thumbnail generation, the sharpening is too strong, resulting in
some aliasing effect being added to the resulting image. It is thus
better suited to small scale resize adjustments such as generating a
smaller image for display on web pages.
You can get exact equivalent result using a
Distort
Resizing operator but with the options
"-filter point -interpolate mesh"
Liquid Rescale
- Seam Carving
Just as Sampling an image resizes by directly removing
or duplicating whole columns and rows from an image, the special IM operator
"
-liquid-rescale" also removes or duplicates columns and rows of
pixels from an image to reduce/enlarge an image. The difference is that it
tries to do so in a more intelligent manner.
First the instead of removing a simple line of pixels, it removes a
'
seam' of pixels. That is the column (or row) that could zig-zag
through the image, at angles up to 45 degrees.
Secondly it tries to remove seams that have the '
least importance' in
terms of the images contents. How it selects this is in terms of the images
energy, or more simply, the amount of color changes a particular 'seam'
involves. The 'seam' with the least amount of changes will be removed first,
followed by higher 'energy' seams, until the image is the size desired.
For more detailed information of liquid resizing and seam carving see,
Wikipedia: Seam Carving,
the
YouTube Video
Demo, and the
PDF
paper: Seam Carving for Content-Aware Image Resizing.
Here for example is the IM logo as it is resize smaller using the IM "
-liquid-rescale"
operator.
  convert logo: -resize 50% -trim +repage  logo_trimmed.jpg
  convert logo_trimmed.jpg  -liquid-rescale 75x100%\!  logo_lqr.jpg
  convert logo_trimmed.jpg  -sample 75x100%\!  logo_sample.jpg
|
![[IM Output]](logo_trimmed.jpg)
![[IM Output]](logo_lqr.jpg)
![[IM Output]](logo_sample.jpg)
The middle image in the above was 'Liquid Rescaled'. Notice how "
-liquid-rescale"
preserved the complex wizard, while squeezing up the less complex stars and
title part of the image. It also squeeze the right foot of the wizard,
producing a little jaggedness in the edge of the cloak, just as it did to the
wizards thin wand.
On the other hand the right-most image is just a normal
Sample Resize (column removal) of the same image, and everything in the
image was equally distorted. The stars are not preserved intact and all the
edges have distinct but uniform
aliasing effects,
which the liquid rescaling restricted to the less complex areas of the image.
It will also expand images, by 'doubling' up the seams found within the image.
convert logo_trimmed.jpg -liquid-rescale 130x100%\! logo_lqr_expand.jpg
|
![[IM Output]](logo_lqr_expand.jpg)
As you can see tries to first double the amount of space between the various
objects (where it can), spreading them out. Though in this case the left most
star and the 'm' gets distorted as the 'seams' going through these 'low
energy' regions are also doubled.
Note however it will only double each seam once, and as such the technique
starts to break down when images are expanded too much. A better method is
often to resize the image larger first, then use liquid rescaling to reduce it
to the desired size. Or to use "
-liquid-rescale" in
multiple smaller steps.
To show the effect of "
-liquid-rescale" better here is an animation, as the same image is
resized all the way down to nothing, then enlarged again. This animation was
created using the shell script
animate_lqr.
Again notice how it tries to preserve the most complex parts of the image, as
much as possible as the image gets compressed into a smaller and smaller area,
right to the very end. That is the spaces in the title is preferentially
compressed first, then the wizards arm, the right side of the wizard, leaving
the most complex middle part of the wizard for the very end.
You can think of liquid rescaling as trying the compress an image that is more
like a sponge, with the open areas being compressed first leaving the
bulky and more structured parts for last.
Seam carving Problems
Liquid Resize, or Seam Carving, works purely by removing whole pixels from the
image. As such like
sampling, it will not generate or
merge colors together, and straight lines and patterns within the image may
become heavily distorted by the operation. That is it can result serious
Aliasing effects, unless some methods of smoothing is
applied.
As a 'seam' can zig-zag through the image, the seams doubled or removed, can
appear to go around complex objects, crunching them together before
compressing them further. Note for example how the word 'Image' in the above
demonstration appears to get shoved under the other letters in the title
without too much distortion.
However for images with 'busy' backgrounds, and less 'busy' foreground objects
such as photos containing peoples faces, the energy function can assume that
the foreground object is less important that the background. This results in
some serious detrimental side effects, that may require human intervention to
resolve.
|
Liquid Rescaling, is currently a highly experimental operation added for IM
v6.3.8-4. It is also not enabled by default, requiring you to built your
own version of ImageMagick with the "liblqr" delegate library before it will work for you.
At this time no expert user controls have been provided. Controls such as
such as the content energy function used, a user provided
preservation/removal filter (adjusting that energy function), or access to
the intermediate images, and functions that the library also provides. It is
assumed that such controls will be provided in the near future, as users
demand them, and we get more internal control of the library functions.
WARNING Do not expect this to remain, as is. It is highly
experimental, and is expected to change in the near future.
|
Distort Resize
- free-form resizing
All the above resize methods all have one limitation which we touched on
earlier, they will round of size of the new image to an integer number of
pixel, then map the old image's pixels to the new pixel array.
This has two effects. First when resizing to a very small size the X scale may
not exactly match the Y scale of the resulting image (a slightly different
aspect ratio). This difference is minor, and unless you get very small it is
usually not noticeable.
The other effect is that you can not resize an image to fit an area that
contains a partial pixel edge, which can be important in further processing,
such image overlays.
It also means you can not use resize to just shift (translate) an image half a
pixel to the right (without actual resize) even though the algorithm could
quite easily do this.
With IM v6.3.6 the General Distortion
Operator "
-distort"
will let you do this and more using its
Scale-Rotate-Translate distortion method. You can also do this using a
Affine distortion based on movements of
control points.
Note however that because the edge of the image can contain partial pixels,
the final image will probably be 2 to 3 pixels larger than you probably would
expect. The extra surrounding pixels will be mixed according to the current
Virtual Pixel setting, which you typically
set to be transparent.
For example here I resize the rose image to 90% (
.9) of its
original size, without rotation (
0), shrinking it around the
center of the image (the default control point if not specified)...
  convert rose: -matte -virtual-pixel transparent \
          +distort SRT '.9,0'  rose_distort.png
| |
![[IM Output]](rose_distort.png)
|
It may not look like an improvement, in fact it has fuzzy edges, but it is an
exact resize without adjustments for a final integer image size, just as you
requested, and perfect for laying images.
Note that I used the 'plus' form of "
+distort" to allow this image
processing operator to set the final images size and offset on the
Virtual Canvas correctly, for further processing
and layering. If this offset is not desired it can be removed using "
+repage" operator.
Here I resized it so the top left corner (
0,0) was moved .5
pixels to the right (to
.5,0) and the rest of the image scaled
around that control point...
  convert rose: -matte -virtual-pixel transparent \
          +distort SRT '0,0  .9  0  .5,0'  rose_distort_shift.png
| |
![[IM Output]](rose_distort_shift.png)
|
Note that as the top edge did not actually move it remained relativally sharp,
while the other edges remained fuzzy. And that is the point, you have exact
control of the resize, not just a quantized fit of the resized image to an
integer number of pixels. That is the distort is an exact re-scaling of the
image, and not just a rough fit.
Other
General Distortion Operator methods,
such as the
Affine distortion method,
provide other ways of controling the final image size based on the movement of
control points. This can be even more versatile resize distortion method.
|
Technically image resizing is a form of Image
Distortion, both of which are techniques of image resampling. It is
just that "-resize" is
a more limited (orthogonal or axially aligned) and coded to provide a much
faster form of the more general "-distort" operator.
|
 |
The "-distort"
operator uses a two dimensional elliptical (distorted cylindrical)
resampling filter method for its image processing. This is slower than
the one dimensional, two pass resampling method used by all the other
resize methods looked at on this section. But it also allows us to
generate higher quality results of more sever image distortions such as perspective views.
|
Affine Resize
- free-form interpolation resizing
The older "-affine"
setting and "-transform" operator, provide a similar free-form resize
capability. However in reality it is equivalent to a calling "+distort" with a 'AffineProjection' distortion
method.
Resize Problems
Resizing to Fill a Given Space
Basically: Resize a large image to completely fill a specific image size but
cropping any parts of the image that does not fit.
|
As of IM v 6.3.8-3 a new resize flag '^' will let you do this
directly as a single resize step. These examples represents an alternative
method that can be used for users with older versions of IM.
See Resize Fill Flag above.
|
The solution is rather tricky as the normal user requirement when
resizing images, is to fit the whole of an image into a given size. As the
aspect ratio of the image is preserved, that leaves extra, unused space in the
area you are trying to fill.
Here we try to resize an image to fill a 80x80 box.
  convert logo: -resize 80x80\> \
          -size 80x80 xc:blue +swap -gravity center  -composite \
          space_resize.jpg
| |
![[IM Output]](space_resize.jpg)
|
In the above we added a backdrop canvas to pad out the unused parts of the
resize box to show the the space we wanted the image to fill, but it didn't as
it preserved the images aspect ratio.
Now if all your images are either landscape style (they are wider than they
are high) then you can of course just resize the image to fit either the
height or width of the area, then use "
-crop" to cut the image to fit it exactly.
  convert logo:    -resize x80  \
          -gravity center  -crop 80x80+0+0 +repage   space_crop.jpg
| |
![[IM Output]](space_fill.jpg)
|
The problem is that, the above will only handle landscape style images It will
fail badly if the image is portrait style (higher than they are wide).
This of course can be solved in a script by first getting the images
dimensions, and then picking the right method to fit the image into the space
needed. But a better solution would be to have IM do all the work
for all images.
The solution within IM is to process the image by resizing each of the images
dimension separately. Then picking the larger image of the two results.
To make this easier, resize itself has a built-in test option which will only
resize an image if that would make the image larger. This allows use a very
nifty solution to our problem.
  convert logo: \
          -resize x160 -resize '160x<'   -resize 50% \
          -gravity center  -crop 80x80+0+0 +repage  space_fill.jpg
| |
|
In the above the second resize in the series will only resize if the width
produced by the first resize was smaller than the area we are trying to fill.
The specific order of the resizes (height first, then width) was chosen as
most images are photographs which are usually longer horizontally. With the
above ordering, such a case will result in the second -resize operation will
be skipped.
If your images are more often portrait images (longer vertically) then change
the arguments to resize the image by height first, then width. For example...
  convert logo: \
          -resize 160x -resize 'x160<'   -resize 50% \
          -gravity center  -crop 80x80+0+0 +repage   space_fill_2.jpg
| |
![[IM Output]](space_fill_2.jpg)
|
The result of both of these examples should be very similar, and the command
will work for both landscape and portrait styles of image, though works better
for one sort.
The biggest problem with this method is that the image is now being resized 2
to 3 times, producing extra blurring and other possible artifacts in the final
result. To reduce this, the initial resizes are performed at double the final
dimensions, which assumes the original image is at least 3 or more times the
size of the final desired result. Not a problem for thumbnail production, but
something to keep in mind.
Resizing Line Drawings
 Under Construction

Thin lines presents a even bigger problem...
Direct resizing causes lines to become faded and disappear into the
background.  This can get so bad that I have seen thumbnails of a line drawing
which was basically blank.  That is every detail of the original drawing
'disappeared'.

Methods...
   Resize then adjust contrast to make lines more visible.
   Blur and darken, to thicken the lines, before resizing.
   Resize in small increments, restoring the lines at each stage.

   Separate line edging from areas of solid colors, and resize, improve
   contrast and re-overlay onto the resized image.

If you come up with some way of effectively resizing lines drawings please
let me (and other IM users) know about it.
Resize Artifacts
- How good is IM Resize
Image resizing has to combat a very difficult problem. How do you reduce a
array of values, into a smaller, or larger array of values so that it look
good to our eyes. A lot of things can go wrong while attempting to do this,
but they fall into four basic categories..
-
Blocking
- Essentially if you enlarge an image simply by replicating pixels, your
will create larger rectangular blocks of pixels. In fact magnifying images
using either "
-scale"
or "-sample" does
exactly that, producing an enlarged pixelated image.
For example here I scale a small image, generating large blocks of
color rather that a nice smooth image. Next to that is a 'resized'
version, and finally a one with a Gaussian filter to blur it a little
more than normal to try to remove some of the blockiness.
  convert storm.gif  -scale  200%  storm_scaled.gif
  convert storm.gif  -resize 200%  storm_resized.gif
  convert storm.gif -filter Gaussian -resize 200%  storm_resized_gas.gif
|
![[IM Output]](storm.gif)
![[IM Output]](storm_scaled.gif)
![[IM Output]](storm_resized.gif)
![[IM Output]](storm_resized_gas.gif)
The primary cause of 'blocking' is either badly anti-aliased source image
(as in the above example), and not enough smoothing between pixels to
improve the overall look of an image.
It is also typically seen when a very low resolution image is being resized
to a much larger scale or for use on a high resolution device, such as shown
above. Typically the most common place this is seen is in the use of a low
resolution bitmap image in user generated newsletters and magazines that was
then printed on very high resolution laser printers. The newsletter looks
great on screen, but 'blocky' on the printed page.
This situation is very hard to fix, and generally best avoided, by using a
much higher resolution clipart, or a freely scalable vector image (such as
SVG, and WMF format images).
-
Ringing
- Ringing is an effect you often see in very low quality JPEG images
close to sharp edges. It is typically caused by an edge being over
compensated for by the resize or image compression algorithm, or a high
quality filter being used with a bad support size.
Here for example I use a special option to select a raw Sinc filter, on
an very sharp color change. I also repeated the operation using IM's
default resize operator, with its default filter selection for image
enlargements.
  convert -size 8x16 xc:'#444' xc:'#AAA' +append  gray_edge.gif
  convert gray_edge.gif -set option:filter:filter Sinc \
                          -resize 100x100\!  gray_edge_ringing.gif
  convert gray_edge.gif  -resize 100x100\!  gray_edge_resize.gif
|
![[IM Output]](gray_edge.gif)
![[IM Output]](gray_edge_ringing.gif)
![[IM Output]](gray_edge_resize.gif)
The above shows quite clearly the over compensation produced by the use of
a raw resize filter, without any of the optimization IM provides. The
second image, produced by the default IM enlargement filter also shows a
very slight ringing effect, but it is barely noticeable.
Here is another example of the ringing effect, this time as produced by a
single pixel, on a large gray background.
  convert -size 1x1 xc: -bordercolor '#444' -border 4x4 \
          -set option:filter:filter Sinc -resize 100x100\! \
          dot_sinc.gif
| |
![[IM Output]](dot_sinc.gif)
|
This image also clearly shows the secondary effects generated by the use
of a one dimensional filter. That is the ringing effect is strongest in
horizontal, and vertical (orthogonal) direction, with 45 degree secondary
ringing.
These effects are not normally visible, and only seen here because of the
use of the raw use of 'Sinc' filter with enlargements.
Typically this type of filter is not used for image enlargements.
-
Aliasing and Moiré Effects
- Aliasing effects are is a generally seen as the production of 'staircase'
like effects along edges of images. Often this is caused either by raw
sampling of image such as using "
-sample", or overly sharpening of image during resizing. A
staircasing effect is most notable in strong minification of images,
though is rarely seen in IM.
However aliasing also has other effects, in particular large scale
Moiré patterns appearing in images containing some type of pixel
level pattern. These low level patterns often produce large scale
Moiré patterns, include: patterns of parallel lines, cloth weaves
(silk exhibits this effect in real life!), as well as brick and tile
patterns in photos buildings and paving.
![[IM Output]](rings_sm_orig.gif) For some examples of resized images producing strong Moiré effects
see the Wikipedia, Moiré Pattern Page.
The classic way of checking if a resize will produce aliasing problems, is
by minifying a Rings Image (see right).
This image will often show Moiré effects when any form of resize is
applied at any scale. Web browsers in particular show such Moiré
effects when display such an image due to the use of a ultra fast resizing
technique.
Here I show the 'rings' image resized using the strongly aliasing
"
For some examples of resized images producing strong Moiré effects
see the Wikipedia, Moiré Pattern Page.
The classic way of checking if a resize will produce aliasing problems, is
by minifying a Rings Image (see right).
This image will often show Moiré effects when any form of resize is
applied at any scale. Web browsers in particular show such Moiré
effects when display such an image due to the use of a ultra fast resizing
technique.
Here I show the 'rings' image resized using the strongly aliasing
"-sample" operator,
the block averaging "-scale" operator and the normal default "-resize".
  convert rings_sm_orig.gif  -sample 100x100  rings_sample.png
  convert rings_sm_orig.gif  -scale  100x100  rings_scale.png
  convert rings_sm_orig.gif  -resize 100x100  rings_resize.png
|
As you can all the resize methods did produce some Moiré effects
though IM's default resize operator produces the least amount of this
undesirable secondary patterns in the final image.
To show the effects of only slight resize, I cropped the corner from the
Large Rings Image, the result of which is
shown first, and then reduced its size by just 5%.
  convert rings_lg_orig.png -crop 105x105+0+0  rings_crop.png
  convert rings_crop.png  -sample 100x100  rings_crop_sample.png
  convert rings_crop.png  -scale  100x100  rings_crop_scale.png
  convert rings_crop.png  -resize 100x100  rings_crop_resize.png
|
![[IM Output]](rings_crop.png)
cropped original
|
|
![[IM Output]](rings_crop_sample.png)
sample
|
![[IM Output]](rings_crop_scale.png)
scale
|
![[IM Output]](rings_crop_resize.png)
resize
|
As you can see even a slight resize will show up any aliasing a resize
operator may have. In fact if you look closely you may even seen a very
light Moiré effect in the unscaled, crop of the original starting
image, which is produced from the limitations of only using a raster image
at a density suitable for display on a comupter screen. That is how
sensitive this test image is in showing aliasing effects caused by
shrinking images.
-
Blurring
- Most people are familiar with blurring that can be generated by the use of
"
-resize". In fact
this is probably the number one complaint about any resize image, and with
good reason. Usually a very small resize will tend to produce a blurred
image, and resizing it again will only make it worse.
The problem is when you resize an image you are changing the image stored
as a 'grid' or array of pixels (known as a 'raster') to fit a completely
different 'grid' of pixels. The two 'grids' will not match except in very
special cases, and as a result, the image data has to be modified to make
it fit this new pattern of dots. Thus it is impossible to directly convert
resize an image and expect it to come out nicely.
The result is a usually a slight blurring of the pixel data. The better
the resize algorithm, the less blurring of sharp edges there is.
However some resize filters, especially ones designed specifically for
enlarging images, often add a lot more blurring than necessary. This is to
combat 'Blocking' artifacts, and was in fact
demonstrated above, by using a 'Gaussian' filter.
For image minification however a blurred edge is often used to avoid 'Ringing' artifacts at sharp edges and reduce possible
Aliasing effects. This however is a poorman's
compromise and one IM tries hard to avoid.
Even so a special expert Filter Blur setting
can be used to adjust the blurring that a filter provides. However be
warned that while a number smaller than 1.0 is supposed to reduce blurring,
it can also make it worse, depending on the exact filter and the resize
ratios that is being used. No guarantees can be given.
|
Before IM v6.3.6-3 the Filter Blur setting
was called "-support", which was very misleading in exactly what it did.
This option has been depreciated and is no longer available.
|
IM Resize vs other Programs
A practical comparison of IM's default resize operator to a number of other
programs in resizing a real-world image has been provided by, 'Bart van der
Wolf' at...
Specifically in summary for IM resize...
Although the amount of sharpening is a matter of taste, the
lack of aliasing artifacts produces the cleanest, most natural looking image
of them all.
He also goes on to look at a 'rings' test, to directly compare various
Photoshop resize methods against ImageMagick...
These articles shows just how important doing resize correctly (and using the
right filtering methods) is to image processing. Which we look at more closely
in the next section.
WARNING: These filter comparisons were made before IM Resize filters were
overhauled for IM v6.3.7-1, and as such the results for
Windowed Filters such as '
Hanning'
and '
Blackman' are incorrect.
Resize Filters
The "
-filter" setting is
the key control on how the "
-resize" algorithm, as well as "
-distort", works to produce a
clean result with the minimum of
Resize Artifacts,
as shown above.
This has been a topic of intense study during the late 1980's, and from which
Paul Heckbert a major researcher in
this field produced and publicly released his "
zoom" image
resizing program This program became the father of most image resizing
programs used today, though few programs implement it properly.
In many ways, these filters are closely related to
Blurring Images and even suffer from the similar problems. However they
are designed to improve the final result when resizing or otherwise distorting
an image.
The names of the filters are a veritable "who's who" of image processing
experts and mathematicians of the past century (or more). They are usually not
a description of the filter, but just a label of the person who either first
published the filter (or filter family), or did the most research into that
filter. This however makes it much harder to know whether a
'
Lagrange' filter is better than say a '
Catrom'
(Catmull and Rom) filter.
Here I will explain the major aspects of Filters for those that want to know.
It is not vital that you learn these things, but I decided to document a
summary of what I learnt, after completing a major research study, and an
overhaul and expansion of the IM filter system, with added expert controls
(IM 6.3.7-1).
Special thanks goes to
Fred Weinhaus for his help in researching during the re-development of
the Resize Filters. He was especially eager for the addition of the
'
Lagrange' family of filters.
How filters work
When resizing an image you are basically trying to determine the correct value
of each pixel in the new image, based on the pixels in the original source
image. However these new pixels do not match exactly to the positions of the
old pixels, and so a correct value for these pixels needs to be determined
in some way.
What is done is to try to use some type of weighted average of the original
source pixel values to determine a good value for the new pixel.
The real pixels surrounding the location of the new pixel forms a
'neighbourhood' of contributing values. The larger this neighbourhood is the
slower the resize. This is a technique called
Convolution.
The amount each real neighbouring pixel (known as a 'sample') contributes to
produce the final pixel is determined by a weighting function. This is the
'
filter' that you can select using the "
-filter" setting. That filter in
turn generally has an ideal neighbourhood size, which is known as the filters
'
support', though it is also known as its 'window'. A pre-defined two
dimensional '
filter' is also known as a '
convolution kernel'.
FUTURE: some diagrams may be helpful here
The design of these weighting functions, or 'filters' is a very complex
business involving some complex mathematics, frequency analysis, and even
Fourier transforms. A good starting point if you are interested in this is
Wikipedia: Nyquist–Shannon sampling theorem. However you really don't
need to go that far to understand existing filters, and there effects on
images.
The Filters
Interpolated Filters
The simplest type of resize filter functions are
Interpolative methods.
These take a specific pixel location in the source image and try to simply
determine a logical color value of the image at that location based on
the colors of the surrounding pixels.
As there is only ever a fixed and minimal number of pixels involved, this type
of filter is a very fast method of resizing or otherwise distorting images.
However this is also the filters downfall, as it will not merge a larger
number of pixels together to form a image that is greatly smaller than the
original image. That in turn can result in strong
Aliasing and Moiré Effects.
Interpolation is usually only used for 'point' sampling images, when no image
scaling is either known or needed. For example when rotating image or minor
distortions, the images scaling or size does not change, and as such a
interpolation can produce a reasonable result, though not a very accurate one.
For more information see IM's
Interpolation
Setting.
It is not however suitable for general image resizing.
Point
Using a "
-filter"
setting of '
Point' basically means to use a unscaled
interpolation filter. For the "
-resize" operator, it will just select the closest pixel to the
new pixels position, and that is all. The
This means that when shrinking an image, the color of an actual pixel in the
source image will be used. No attempt will be made to merge colors or
generate a better color for the resulting image.
In fact "
-filter point -resize" will produce the same result
as "
-sample", though the
latter is faster as it is dedicated to resizing images by point sampling.
  convert -size 10x10 pattern:gray50  checks_10.gif
  convert checks_10.gif -filter point -resize 9x9  checks_point-1.gif
  convert checks_10.gif -filter point -resize 8x8  checks_point-2.gif
  convert checks_10.gif -filter point -resize 7x7  checks_point-3.gif
  convert checks_10.gif -filter point -resize 6x6  checks_point-4.gif
  convert checks_10.gif -filter point -resize 5x5  checks_point-5.gif
|
![[IM Output]](checks_10.gif)
|
|
![[IM Output]](checks_point-1.gif)
Point-1
|
![[IM Output]](checks_point-2.gif)
Point-2
|
![[IM Output]](checks_point-3.gif)
Point-3
|
![[IM Output]](checks_point-4.gif)
Point-4
|
![[IM Output]](checks_point-5.gif)
Point 50%
|
As you can see even at this level, you will get extreme
blocking and
aliasing in the resulting image.
As such a '
Point' filter, or the faster
Sampling Operator is not recommended for good results.
Box
The '
Box' filter setting is exactly the same as
'
point' with one slight variation. When shrinking images
it will average, and merge the pixels together. The smaller the resulting
image the more pixels will be averaged together. In other words the filter
is 'scaled'. The fast "
-scale" resize operator does exactly the sample thing.
![[IM Output]](graph_filter_box.gif)
Here is a graph of the filters weighting function, from which you can see why
it is called a '
Box' filter.
Basically any pixel that falls inside the 'Box' will be directly used to
calculate the color of the new pixel. Now as the filter is only 1/2 a pixel
wide, for a unscaled image that means only one, the closest pixel, will be
used. In other words when no scaling is involved (or only magnification)
the nearest pixel to the new location will form the color of the new pixel.
However if a image is being made smaller, more of the source image will be
compressed into that one pixel. Accordingly the filter will be 'scaled' to
cover a larger area, and more than one pixel will be involved. The result is
that more pixels will be averaged together to produce the color for the pixel
in the smaller image.
For example here is an enlarged view of a checkerboard pixel pattern
as it is being slowly compressed using a '
Box' filter.
  convert checks_10.gif -filter box -resize 9x9 -sample 90x90 checks_box-1.gif
  convert checks_10.gif -filter box -resize 8x8 -sample 80x80 checks_box-2.gif
  convert checks_10.gif -filter box -resize 7x7 -sample 70x70 checks_box-3.gif
  convert checks_10.gif -filter box -resize 6x6 -sample 60x60 checks_box-4.gif
  convert checks_10.gif -filter box -resize 5x5 -sample 50x50 checks_box-5.gif
|
|
|
![[IM Output]](checks_box-1.gif)
Box-1
|
![[IM Output]](checks_box-2.gif)
Box-2
|
![[IM Output]](checks_box-3.gif)
Box-3
|
![[IM Output]](checks_box-4.gif)
Box-4
|
![[IM Output]](checks_box-5.gif)
Box 50%
|
As you can see more and more pixels become merged together as the image is
resized smaller using a '
Box' filter. But that the merger occurs
in specific, equally spaced, rows and columns. This causes all sorts of
artifacts and Moiré or
Aliasing effects when
both shrinking images and enlarging.
This is also why it is recommended that '
Box' filtering or image
"
-scale" is only
performed to 'bin' images. That is reduce images by integer multiples to
ensure the resulting image remains clean looking, such as in the final image
above.
Of course both '
Point' and '
Box' filters will
produce the same 'pixel replication' method for enlarging images, as both will
result in a simple 'nearest-neighbour' selection.
  convert -size 5x5 pattern:gray50  checks_5.gif
  convert checks_5.gif -filter box   -resize 6x6  checks_box+1.gif
  convert checks_5.gif -filter box   -resize 7x7  checks_box+2.gif
  convert checks_5.gif -filter box   -resize 8x8  checks_box+3.gif
|
Triangle
![[IM Output]](graph_filter_triangle.gif)
The '
Triangle' or '
Bilinear' interpolation filter just takes the interpolation of the
nearest neighbourhood takes things one step further. Instead of just directly
averaging the nearby pixels together, as '
Box' does, it weights
them according to how close the new pixel is to the original pixel. The
closer the new pixel is to a source image pixel, the more color that pixel
contributes.
This produces a more global averaging of colors when images are being reduced
in size.
  convert checks_10.gif -filter triangle -resize 9x9 checks_tri-1.gif
  convert checks_10.gif -filter triangle -resize 8x8 checks_tri-2.gif
  convert checks_10.gif -filter triangle -resize 7x7 checks_tri-3.gif
  convert checks_10.gif -filter triangle -resize 6x6 checks_tri-4.gif
  convert checks_10.gif -filter triangle -resize 5x5 checks_tri-5.gif
|
|
|
![[IM Output]](checks_tri-1.gif)
Tri-1
|
![[IM Output]](checks_tri-2.gif)
Tri-2
|
![[IM Output]](checks_tri-3.gif)
Tri-3
|
![[IM Output]](checks_tri-4.gif)
Tri-4
|
![[IM Output]](checks_tri-5.gif)
Tri
|
For enlargement, you will also get an averaging of colors.
  convert checks_5.gif -filter triangle -resize 6x6  checks_tri+1.gif
  convert checks_5.gif -filter triangle -resize 7x7  checks_tri+2.gif
  convert checks_5.gif -filter triangle -resize 8x8  checks_tri+3.gif
  convert checks_5.gif -filter triangle -resize 9x9  checks_tri+4.gif
  convert checks_5.gif -filter triangle -resize 10x10 checks_tri+5.gif
|
![[IM Output]](checks_5.gif)
|
|
![[IM Output]](checks_tri+1.gif)
Tri+1
|
![[IM Output]](checks_tri+2.gif)
Tri+2
|
![[IM Output]](checks_tri+3.gif)
Tri+3
|
![[IM Output]](checks_tri+4.gif)
Tri+4
|
![[IM Output]](checks_tri+5.gif)
Tri+5
|
For large scale enlargements the result acts as if a gradient of colors
was added between each and every pixel. For example here I generate a
very small image with a single white pixel (the display is an enlarged view).
I then enlarge that image enormously.
  convert pattern:gray5 -crop 5x1+0+3 +repage pixel_5.gif
  convert pixel_5.gif  -filter triangle -resize 300x  pixel_triangle.gif
|
![[IM Output]](pixel_5.gif)
Single Pixel Image
|
|
![[IM Output]](pixel_triangle.gif)
Triangle Filtered Enlarged
|
If you were to graph the colors in the above image (using the "
im_profile" script), you will see a
replica of the triangular filter graph.
![[IM Profile]](plot_triangle.gif)
Profile of Image
As you can see the central pixel was merged with the neighbouring pixels to
produce a linear gradient of colors between those points.
All the interpolation filters, produce similar simple gradients between
neighbouring pixels and is also the reason why they are well suited to image
enlargements.
Other Interpolation Filters
![[IM Output]](graph_interpolation.gif)
To the right I have graphed the various interpolation filters, except for
'
Point' which is a very special case of '
Box'.
Other interpolation filters include '
Hermite' which is
very similar to triangle in results, but producing a smoother round off in
large scale enlargements.
![[IM Output]](graph_lagrange_interpolate.gif)
The '
Lagrange' filter has been called a 'universal'
interpolation filter. By varying the 'support' size (See the
support expert setting below), it can in generate
all the previously looked at interpolation filters (except
'
Hermite'). The default settings (a Lagrange order 3 filter as
shown as the purple line) provides a variation of the 'bicubic' type of
interpolation. (see below).
As an interpolation filter the default works very will, though with some minor
ringing effects. However the sharp gradient change is
often notable on very large scale image enlargements.
More on the
Lagrange Filter later.
![[IM Output]](graph_filter_catrom.gif)
The '
Catrom' (Catmull-Rom) filter is another filter that
produces a 'bicubic' interpolation function over a larger area. This filter
will also produce a reasonably sharp edge, but without a the pronounced
gradient change on large scale image enlargements that a
'
Lagrange' filter can produce. This in turn will reduce the
amount of noticeable
blocking effects, but does so
at the cost of increased
ringing effects in the
resulting image.
We will also look at this filter more closely later in
Cubic Filters.
Interpolation and IM's Interpolate Setting
The
Interpolate setting of IM which is
used to produce an unscaled 'point' lookup of images in operators like the
FX DIY Operator ("
-fx") and
Color Lookup Replacement Operator ("
-clut") and some older
Circular Distortion functions are based on
these simple interpolation resize filters. However they are currently
implemented using separate code and also have different setting names.
These
Interpolation Settings include:
'
NearestNeighbor',
implementing the '
Point' (or unscaled '
Box') filter,
and '
BiLinear' to get a
unscaled '
Triangle' filter.
ASIDE: At this time the smoothed triangle filter 'Hermite' has
not been directly implemented as a Interpolation Setting, which is a shame as it is quite a good
interpolation filter.
However there is some confusion as to just what resize filter should be used to
implement a 'Bicubic' (16 pixel
interpolation) Interpolation Setting. Many
programs implement the 'Catrom' filter to produce a smoother
gradient but with more ringing, while others, including IM, implement the
'Lagrange' (Lagrange order 3) filter.
|
Before IM version 6.3.5-3, the Interpolation
Setting 'Bicubic' was based
on a very blurry 'B-Spline' filter (the IM 'Cubic' filter, see below).
That interpolation setting has now been renamed to 'Spline', with the 'Bicubic' setting now based on the
default Lagrange-3 (support=2.0) filter as discussed above.
|
Gaussian Blurring Filters
In the complex mathematics of Fourier Transforms into frequency domains,
resize filters are meant to remove any high frequency noise that may be
present. This noise is caused by the sampling of a real world image into
pixels, and when you resize an image that noise appears as aliasing and
Moiré effects.
Because of this the Gaussian Bell Curve became a natural early candidate as a
resizing or resample filter, as it is the ideal modal of real world effects.
Gaussian
![[IM Output]](graph_filter_gaussian.gif)
The
Gaussian filter is a very special filter that generates that same
'bell curve' shape in the frequency domain. This makes it very useful as an
image filter as it guarantees a good removal of this high frequency noise in a
highly controllable way.
However if you examine the filter graph, you will see that at a distance of
one pixel from the sampling point, you have a non-zero value. In fact it is
quite a high value indeed. This results in a huge amount of blurring of the
individual pixels, even when no resize is actually performed. In fact you
would get the same result as a
Blur operator.
For example here I have resized the standard IM logo, using a Gaussian filter
and again using the normal IM filter ('
Lanczos' in this case
which we will look at latter)
  convert logo:  -filter Gaussian  -resize 150x logo_gaussian.png
  convert logo:                    -resize 150x logo_normal.png
|
![[IM Output]](logo_gaussian.png)
![[IM Output]](logo_normal.png)
If you look closely you will see that the left '
Gaussian'
filtered image is more blurry than the normal resize. Especially with regard
to the detail of the smaller stars around the wand and on the wizards hat.
This blurring of the image is the trade off you get for removing all the
aliasing effects in image reduction, as well as all
blocking effects on image enlargement. It will also
never produce any
ringing effects (when applied
perfectly). But all that is at the cost of extreme
blurring for the resulting image.
In fact during enlargement this filter will generate round pixel dots, rather
than square looking dots. For example, here I greatly enlarge a 3x3 pixel
image with a single dot in the center.
  convert -size 3x3 xc:yellow -fill red -draw 'point 1,1' \
          -filter Gaussian   -resize 100x100  -normalize dot_gaussian.jpg
| |
![[IM Output]](dot_gaussian.jpg)
|
As you can see a single pixel enlarges into perfectly circular dot. Only
Gaussian and Gaussian-like filters will do this.
Other Gaussian-like Filters
![[IM Output]](graph_gaussian.gif)
If you study the comparative graphs to the right you will see that
'
Quadratic' filter as well as the slightly more complex
'
Cubic' filter follow the weighting curve of the
'
Gaussian' filter quite well. And being polynomial functions they
are also a lot faster to calculate, which was why they were originally
invented.
Actually both the '
Quadratic' and the '
Cubic' filter
will produce a slightly more blurry result. The later being the most blurry of
all the filters provided by default by IM. Examining the graphs you will see
that unlike the
Interpolation Filters they
have a non-zero value at a distance of 1.0 from the sampling point. This
causes the nearby pixels to merge there colors, and is the cause of the
blurring you see. The '
Cubic' filter having the highest value at
the 1.0 distance producing the largest amount of blurring.
The '
Mitchell' filter is also shown in the comparison
graph. This filter also has a some blurring at the 1.0 distance from the
sampling point, also making this filter slightly blurry in comparison to the
other filters we have seen. Basically the '
Mitchell' was picked
by subjective testing as being a compromise between all four general
Resize Artifacts (See
Cubic
Filters below). As such while it is very slightly blurry it isn't overly
so. It is also the default filter used for image enlargements, though it may
not always be the best filter.
Filter Blur Expert Option
A special setting "
-set
option:filter:blur {value}
" can be used to adjust amount of
blurring that a filter provides. A value of '
1.0' producing the
default action, while smaller and larger values adjust overall 'blurriness'.
For example...
  for blur in 0.5 1.0 1.5; do \
    convert logo: -set option:filter:blur $blur -filter Gaussian \
            -resize 150x logo_blur_$blur.png; \
  done
|
![[IM Output]](logo_blur_0.5.png)
blur 0.5
|

|
![[IM Output]](logo_blur_1.0.png)
blur 1.0
|
|
![[IM Output]](logo_blur_1.5.png)
blur 1.5
|
As you can see, this special setting will let you control the overall
blurriness of the result for '
Gaussian' and the other
Gaussian-like filters (see above). If fact using a
value of '
0.7' will make most
Gaussian-like filters produce a very good result, with a more acceptable
amount of blur.
However reducing the
blurring of the filter will
enhance the
aliasing effects, thus more likely to
generate large scale Moiré effects from low pixel level patterns.
  convert rings_crop.png -filter gaussian -resize 100x100 rings_gaussian.png
  convert rings_crop.png -set option:filter:blur 0.5 \
                   -filter gaussian -resize 100x100 rings_gaussian_sharp.png
|
![[IM Output]](rings_gaussian.png)
Gaussian
|
|
![[IM Output]](rings_gaussian_sharp.png)
blur 0.5 (sharpened)
|
|
Using this setting with other filters containing negative weightings
(basically any of the filters we will look at below) can produce more
blurring instead of less. Caution and expertise is required to use this
special option with non-gaussian like filters.
|
|
Before IM v6.3.6-3 the 'option:filter:blur' setting was
mistakenly called "-support", which was very misleading in exactly what it did.
This option has been depreciated, and may produce warnings when used in all
future versions of IM.
|
Filter Support Expert Option
The gaussian filter also has one important property, the effects of which we
have already seen above. This filter is known as a IIR (Infinite Impulse
Response) filter, which simply means it never reaches zero. That is no matter
how far away from the sampling point you get, you will still have some
non-zero contribution to the result from very distant pixels.
In mathematical terms this is actually a good thing, as it means the result is
much more mathematically perfect. In practical application it is very bad, as
a infinite filter requires you to use a weighted average of every pixel in the
original image, to generate each and every new pixel in the destination image.
That means that large images will take a very very long time to resize correctly.
However for the '
Gaussian' filter anything beyond a range of
about 1.5 pixels from the sampling point will generally produce very little
effect in terms of the final result, and as such can be generally be ignored.
In fact if you look closely at the above
graph of the default '
Gaussian' filter line you
will see that the curve suddenly 'stops' at a distance of '
1.5'
from the sampling point. This range is known as the filters '
support'
and is the programs practical limit for the filter.
![[IM Output]](graph_filter_gaussian_1.25.gif)
If you really want, you can change the 'support' of a filter using the special
expert setting "
-set
option:filter:support {value}
". For example here I resize a
image with a single pixel using a smaller support value of 1.25 (see the
resulting graph right).
This modified filter was then used to enlarge a small image with a single
white pixel in the middle.
By using smaller '
support' setting, the 'step' was moved to the
1.25 position. That is turn results in a larger 'stop' in the filters profile.
This in turn results in a 'aliasing' effect that you can see close to the
center of the enlarged image (the wiggle near the 'peak' of the graph)
as well as a sudden 'drop' at the edges of the filters 'support' limits.
You can think of 'support' as being a sliding 'window' across the pixels being
averaged together to produce the enlarged image result. As the support
size is 1.25, the filters total support area is 2.5 pixels wide (unscaled
during image enlargements), as such you can have either 2 or 3 pixels involved
in the horizontal resizing phase.
As each pixel enters or leaves this support 'range' as it slides accross the
image being generated, the sudden 'stop' in the causes a slight jiggle to
appear in filter-weighted average that is returned. That is at these points a
pixel is being added or removed from the total number of pixels being averaged
together according to the filter weighting curve.
This in turn produces four such 'jiggles' or 'zig-zags' in the resized image.
An initial two on the outside edges when the single white pixel enters/leaves
the support range. And a second pair of jiggles, as a second black pixel
(making a three pixel weighted average) enters/leaves the support range.
If there wasn't such as sudden 'stop' in the filter, that is the filter goes
to zero at the support limit setting, then you would not see the 'jiggles' and
you would not have the visible 'aliasing' effect.
Also using a support size set to an integer or half-integer would always
ensure that as a new pixel becomes part of the filtered average, another is
leaving, so that the same number of pixels is always part of that average.
That would remove the two 'center' jiggle, but not the initial jiggle on the
outside, marking the support limits.
|
Before IM v6.3.6-3 'support' for the Gaussian filter was set to this value
of '1.25' producing Ringing effects in
enlargements (such as shown above). For this reason the 'support' for
gaussian was changed to produce a much smaller step (an far less ringing) by
using larger default 'support' of '1.5', with very little speed
reduction in the algorithm.
|
Note however that if you use a very large support setting then of course more
pixels will need to be averaged together making the resize operation slower,
without any real improvement in results. Only the
windowed-sinc and
Lagrange filters can generally
produce a better result by using a support factor that is larger than 2.0.
Remember these are 'expert' options, and as such you are more likely to make
things worse rather than better by using these options. That is why they are
not a simple command line option, but provided via the special "
-set" option.
Windowed Sinc/Bessel Filters
Sinc/Bessel Perfect Filters
Mathematics has determined that the ideal filter for resizing images is either
the
Sinc() function or the
Jinc() function, depending on the
purpose the filter is being used for. (See
Nyquist-Shannon sampling theorem)
![[IM Output]](graph_sinc_jinc.gif)
Here is a graph of these two infinite weighting functions.
The
Sinc() being mathematically perfect has some special features that
I would like to point out. First at every integer distance from the weighting
function for the filter becomes zero. This is as mentioned before very
important as it means that the filter does not blur the image more than
necessary (unlike
Gaussian Filters).
The other major difference between this and previous filters is that some of
the weightings have negative effects. That is they will subtract some of the
nearby color pixels from the final color in each pixel in the image. This
may seem a little strange but it results in a very strong sharpening of the
edges of objects. Unfortunately any negative weights need to be offset by
positive weights which produces the wave like function you see. This in turn
causes
ringing artifacts in images which contain lots
of sharp boundaries such as line drawings if the filter is
applied improperly.
The
Jinc() function (more commonly known as a '
Bessel'
filter) is the equivalent filter for use in a two dimensional cylindrical, or
radial filtering operation though it is not a perfect fit in this regard.
Though very similar and closely related to
Sinc() (see
graph) it is designed to filter a rectangular
array of values using a radial or cylindrical distance, rather than orthogonal
(axis aligned) distance.
It is impossible to create a perfect fit between a radial distance and a
rectangular array of values, but does produce a reasonably good result, and
makes it work better for images which are not only being resized but also
rotated and or sheared by some non-orthogonally aligned angle. As such it is
the best filter to use for the
Distort elliptical
resampling method.
This form of windowing filter will automatically be selected when a operator
needing a cylindrical or radial filter is selected. At this time only the
General Distortiong Operator requests such a
filter, though some future
Convolution Operators
operators may also make a similar selection.
However for normal orthogonal resizing, a windowed
Sinc() will be used,
and you can just think of these filters as being based on that function.
Windowed Sinc/Bessel
Unfortunately both of the these functions are also IIR (Infinite Impulse
Response) weighting functions. This means that to use them, you would need to
generate a weighted average of every pixel in the image (and beyond) in order to
create the best representation for each and every new pixel in the
destination image. This is prohibitively expensive, making the raw use of
these raw perfect filters unpractical.
Unfortunately unlike the
Gaussian Filter these
functions do not just taper to zero a short distance from the sample point.
In fact a even at 10 pixels away from the current sampling point you can get
appreciable effect on the final result. However resizing an image using a
filter that has a support distance of 10 would require a averaging of at least
20x20 or 400 pixels per final pixel generated. That is very slow.
As a consequence, IM does not allow (direct and simple) access to either the
Sinc or the Bessel weighting functions in its raw infinite form. That is not
to say it can not be done (see
Expert Filter
Settings below), it is just not directly available using the simple
predefined "
-filter"
setting.
What is provided instead are 'windowed' forms of these filters and techniques,
which have been developed by image processing experts, that can be use to
'limit' the infinite Sinc and Bessel functions to a more practical size.
These
Windowing Filters include: '
Blackman',
'
Bohman', '
Hanning', '
Hammming'
'
Lanczos'. '
Kaiser', '
Welsh',
'
Bartlett', and '
Parzen'.
How Windowed Filters Work
![[IM Output]](graph_sinc_windowing.gif)
For example, the graph to the right shows three functions (click to get an
enlarged view). The red function is the mathematically ideal
Sinc()
function, which stretches off to infinity. The green function is a "Hanning"
windowing function (based on a simple Cosine() curve . This is multiplied
with the
Sinc() to modulate the more distant components of the filter,
reaching zero (or near zero) at the edge of the support window (typically 4.0
in ImageMagick).
Basically by selecting '
Hanning' for the "
-filter" selection you are in
reality selecting a '
windowing function' for either the
Sinc()
or the
Jinc() (Bessel) function, depending on what type of filter is
needed.
As such 'Windowed Filters' are really two functions. Either the Sinc or the
Bessel function (according to the needs of the operator that will be using the
filter), and the 'windowing function' you have specifically selected. (See
Expert Filter Controls below).
|
Before v6.3.6-3, IM made the grave mistake of actually using the windowing
function directly as the filters weighting function. This in turn caused
all these filters to produce rather badly aliased
images, when used for resizing. As a consequence the filters were often
mis-understood or rarely used. This has now been fixed.
|
The Various Windowing Filters
![[IM Output]](graph_windowing.gif)
To the left is a graph of all the various windowing functions that IM has
available at the time of writing. Yes there are a lot of them as windowing
functions have been the subject of intense study by numerous signal processing
experts.
![[IM Output]](graph_windowed_sinc.gif)
And to the left is the resulting windowed-sinc filters that would be used by
selecting those window functions. All of the windowed filter functions will
generally use a support of 4.0 for Sinc (4 lobes) and 3.238 for Bessel (3
lobes). The '
Lanczos' filter is an exception (default support is
3.0), but is graphed (see right) using a 4.0 support for comparison purposes.
As you can see all the windowed filtered functions produce a muted form of the
original
Sinc() function that is also shown. And other than the amount
of
ringing a specific filter generates there is often
very little to distinguish one windowed filter from another.
Probably one of the best windowed filters is '
Lanczos'
which uses the first 'lobe' of the Sinc/Bessel function to window, the
Sinc/Bessel function. That is the filter weighting function is used to set the
filters own windowing function.
Other good windowing filters, which are all based on similar ideas of using
refined Sine/Cosine functions for windowing include
'
Blackman', '
Bohman',
'
Hanning', and '
Hamming', all of which
make reasonable windowed filters and are quite common within the many
image processing packages.
The other windowing filters: '
Welsh', '
Parzen',
'
Kaiser', and '
Bartlett', are based on using other
windowing methods, many of which are also used as resampling filters in there
own right. For example the '
Bartlett' windowing function is
actually a '
Triangle' (or '
BiLinear') interpolation
filter.
|
The pre-defined 'Sinc' and 'Bessel' "-filter" settings are windowed
using the default 'Blackman' windowing function. As such
selecting 'Sinc' as a filter for a "-resize" operation is
equivalent to specifying a 'Blackman' filter.
However you will always get the actual underlying weighting function (Sinc(),
or Jinc() respectively) instead of that function being selected according
the type of image operation being performed. As such selecting
'Sinc' or 'Bessel' as a "-filter" setting is NOT
recommended.
|
You can look at more detailed definitions and graphs of the various windowing
functions, and there results in the Fourier Frequency spectrum on
Wikipedia, Window
function.
Windowing Effects (Lobes)
As I mentioned the underlying Sinc/Bessel Weighting function is actually
infinite in size. Though by default IM limits them using the specified
windowing method to a much smaller, more practical size.
However there may be some situations where you really want to try and get a
much better, more exact resizing of the image using a much larger, and slower
window (support) size. That can even be done quite simply using the
Filter Support expert control, just as we did for
Gaussian-like filters.
The windowing function itself will (in most cases) reduce the Sinc/Bessel to
zero over the
support setting range. But as
the windowing function is scaled to fit the 'support' window, the resulting
filter function will also change.
![[IM Output]](graph_lanczos_lobes.gif)
For example to the left I have graphed the '
Lanczos' windowed
filter, against the
Sinc() function as a reference, using various
'support' settings from 2 to 8. Note that the actual size of the filter is
limited the actual support size used. The smaller the 'support' the faster
the filter, but the less exact the function follows the mathematically ideal
Sinc() function.
Look closely at each of the graphed curves. The 'green' (support=2) curve
only have the main central peak, plus one negative 'lobe'. After this the
function is just zero, and not used. The next 'purple' (support=3, and the
default) curve, as a much larger first negative 'lobe' then a smaller positive
'lobe'. This continues on with more lobes being added, as teh support size
increases by integer increments. The added lobes are smaller and smaller in
height producing less and less influence on the final result, but with the
initial lobes becoming higher (more influence).
For best effect you would use an integer as a support setting, to generate a
filter with that many up/down 'lobes' in it. Though the final few 'lobes' will
generally have very little impact on the final result. By default the
'
Lanczos' filter will have 3 'lobes'. Most the other
Windowed Filters default to 4 'lobes'.
However while the
Sinc() function has a 'lobe' for each integer
'support' setting, the
Jinc() or Bessel weighting function does not.
This presents a problem for users wanting to adjust the support window for a
filter being used with the
Distort operator. In fact
Jinc() has 'zero crossings' at highly
irrational numbered
positions. These zero crossings are very difficult to work out without being
a mathematical expert.
To make it easier to set a filter in terms of the number of 'lobes' it has
another special setting was created, "
-set option:filter:lobes {integer}'.
If the filter is being used by a 2 dimensional image resampling operator such
as the
General Distortion Operator, which
requires the use of the Bessel weighting function, it will look up a table of
the first 20 zero crossing for the filter, and set the '
support' setting to that value. This means you
don't have to try to find the appropriate support setting for the Bessel
function, just specify the number of lobes you want to use.
In most cases this acts exactly like a normal '
support' setting, except that it only excepts an integer argument.
Just as an example of using a larger 'support' size, or 'lobes', here I
resized the IM logo image in various ways, and zoomed in on a small section so
you can look at the details of the resulting image.
The first image, is a direct resize of the image using a
'
Hanning' windowed filter. This is a base-line image to compare
against. The next image was also resized using the same way, but in 15 small
steps. This enhances any image artifacts that may have been generated by the
filter. Finally I repeat the process again but using a much larger 8 'lobe'
version of the filter. The default for '
Lanczos' is 3 lobes.
  convert logo: -filter Hanning   -resize 132x99  \
          -crop 40x40+67+10\! -scale 300% logo_lobes_0.png
  convert logo: -filter Hanning  \
          -resize 90% -resize 90% -resize 90% -resize 90% -resize 90% \
          -resize 90% -resize 90% -resize 90% -resize 90% -resize 90% \
          -resize 90% -resize 90% -resize 90% -resize 90% -resize 90% \
          -crop 40x40+67+10\! -scale 300% logo_lobes_3.png
  convert logo: -filter Hanning -set option:filter:lobes 8 \
          -resize 90% -resize 90% -resize 90% -resize 90% -resize 90% \
          -resize 90% -resize 90% -resize 90% -resize 90% -resize 90% \
          -resize 90% -resize 90% -resize 90% -resize 90% -resize 90% \
          -crop 40x40+67+10\! -scale 300% logo_lobes_8.png
|
![[IM Output]](logo_lobes_0.png)
Single Resize
|
![[IM Output]](logo_lobes_3.png)
Resized 15 Times
|
![[IM Output]](logo_lobes_8.png)
With a 8 lobed filter.
|
FUTURE: substitute an example of an incrementally rotated image, rather
that a resize image for the above.  This should produce a better example of
why a resize filter and enlarged support can be so important.
Look very closely at the pixels for the binary numbers on the wizards hat.
The middle image with the smaller default number of 'lobes' in the filter
blurred the numbers together, while they are much more distinct in the first
and final image.
Unfortunately as the image used is very cartoon like, the ultra sharp
boundary around the wizards hat produced some
ringing
effects that while present in all the images, was much more visible in the
final image.
Lagrange Filter
Just as the '
Gaussian' filter is a
mathematically slow function (not that it affects the overall speed very much
thanks to IM's caching of results), the
Sinc/Bessel Windowed Filters are even slower and more complex to compute
due to the need to compute both a weighting function and a windowing function.
Because of this the '
Lagrange' filter generates a piece
wise cubic polynomial function to approximate a windowed filter. (See
Wikipedia: Lagrange
Polynomial). Just as
Windowed Filters are
adjustable according to the
Support Setting,
the '
Lagrange' filter also will adjust itself according to that
setting.
The default
support setting of 2.0 generates a
'
Lagrange' filter (order 3) that is commonly used as a '
Bicubic' interpolation method. This
filter is quite good for both enlargement and shrinking of images. with
minimal
blocking and
ringing
effects and no
burring effects.
![[IM Output]](graph_lagrange_windowed.gif)
With larger
support settings, the
'
Lagrange' filter generates a
Windowed Sinc Filters without needing a complex trigonometric function
calculation, or even additional windowing functions. The larger the support
setting the closer to a
Sinc() function the filter emulates, but also
the slower the calculation. (see graph of larger support Lagrange filters
left).
Using a smaller
support settings and the
'
Lagrange' filter emulates most of the various
Interpolated Filters. That is a support size
of '
0.5' will generate the '
Box' filter, and
'
1.0' a '
Triangle' filter.
The
support setting is limited to adjustments
of half-integers, and using any other support factor is not very productive.
![[IM Output]](graph_lagrange_even.gif)
The other half-integer support, Lagrange Filters (generating even orders),
produce a very disjoint set of filter weightings, and much like the
'
Box' filter, they can produce some strong
blocking resize artifacts. On the other hand for small scale resize this
can ensure that images kept sharp for very small resize adjustments.
These 'even' ordered '
Lagrange' filters, actually highlight the
main disadvantage of using this filter, that is the weighting function is not
a 'smooth' gradient. This means in large scale enlargements you can get
visible changes in the generated gradient. This is rarely a problem however
except in those extreme cases.
Basically it represents a filter that universally emulates the best filter for
the current given '
support' setting, regardless
of how big or small that setting is. It is 'the' self-windowing resize
filter.
|
The Support Expert Control is really
defining the 'order' of the Lagrange filter that should be used. That is
the default 2.0 support Lagrange filter, generates a Lagrange filter of
order 3 (order = support × 2 - 1, thus support=2.0 => Lagrange-3
filter). This is why you can really only use a setting in half-integer
sizes.
As such to get a Lagrange order 4 filter you would use the option
-set option:filter:support 2.5
|
|
The 'Lagrange' filter was not fully
defined and usable until IM version v6.3.7-1.
|
Cubic Filters
As many image experts were trying to find a better, and faster to calculate
filter for image resizing, a family of filters evolved, and became known as
Cubic Filters. This are much like the
Lagrange
Filters shown previously, and were made up of smaller piece-wise sections.
However unlike Lagrange filters the pieces were designed to fit together to
form a smooth curve, to reduce sharp
blocking
effects.
![[IM Output]](graph_cubics.gif)
Shown in the graph left are four such 'smooth' cubic filters that are
pre-defined within IM, and well known for use as resize filters.
The '
Cubic' filter emulates a
Gaussian Blurring Filter. This curve is also known as a 'B-Spline'
interpolation curve, and is also used if drawing lines and animated motions of
objects in time.
Also shown is '
Catrom', or more correctly the 'Catmull-Rom
Filter' or 'Keys Cubic Convolution' which generates a smooth non-blurring form
of
Interpolation Filter, as well as the
'
Hermite'
Interpolation
Filter.
But there were many other families of Cubic Filters that were being proposed
by various experts, to try to reduce the
Resize
Artifacts that was being seen in images. For example there is the whole
'B-Spline' family of cubics providing various degrees of filtering between
blurring ('
Cubic') and
blocking ('
Hermite').
Then there was the 'Cardinal' family, which produces filters compromising
between
blocking and
ringing,
artifacts and from which the 'Catmull-Rom Filter' ('
Catrom')
evolved as balanced compromise of these artifacts.
These two families then merged to try to find a even better balance with the
advent of the 'Keys' filters, which linked the 'Catmull-Rom Filter' (Keys
α = 0.5) with the 'B-Spline Cubic Filter' (Keys
α =
0.0).
Confused? Of course you are. So was everyone else!
The problem is that the results of filters are often very subjective,
dependant of the image, and the restrictions of the 'family' you are using.
Into this, Don P. Mitchell and Arun N. Netravali, came out with a paper, '
Reconstruction Filters in Computer Graphics', which formulated two
variables known as 'B' (as used for 'B-spline' curves) and 'C' (equivalent to
the 'Keys' filter
α value) from which you can generate any
smoothly fitting piece-wise cubic filter.
![[IM Output]](cubic_survey.gif)
Further more they then surveyed a group of 9 image processing experts, to
classify the
Artifacts produced by enlarged images
using various values. The results of that survey are shown in the diagram to
the right. The 'green' area represented values the experts regarded as
producing and acceptable result, while the various other areas produces the
various types of
Artifacts.
This image is important as it really shows the relationships between the
various
Artifacts with the various different types
of filters.
You can also see from the results why the 'Keys' family of filters became so
important, as one of the better methods of generating good cubic filters. Its
filters basically fell in a line directly through the area regarded as
'acceptable' by image processing experts.
From this survey, Mitchell and Netravali determined that the best filter was a
'Keys' family filter, which fell in the middle of the acceptable area, using
B,C values of 1/3,1/3. This filter is now known as the 'Mitchell-Netravali
Filter' and is available in IM as the '
Mitchell' filter
setting. Basically it is a compromise of the acceptable effects of the resize
artifacts. It is also the default filter used for IM image enlargements.
ASIDE: As a personal thought, I wonder if anyone looked into using a
negative-blur, to try and produce a sharper image? The 'Keys' filter family
for example continues into the area below the diagram, though Mitchell and
Netravali did not seem to look into it.
All four of the IM Cubic filters: '
Mitchell',
'
Catrom', '
Cubic', and '
Hermite'; have
also been marked in the above diagram, showing what those experts thought of
those specific filters.
Internally those filters only differ by the pre-defined B,C settings of the
filter, in fact IM uses the same library function, only with different B,C
settings, for all four filters.
Cubic B,C Expert Settings
As of IM v6.3.6-3 you can use the special expert settings to set the B,C
settings that a
Cubic Filter is using. To do
this you need to select any one of the four Cubic filters, and the desired
'
b' and '
c' expert settings. For example...
   -filter Cubic
   -set option:filter:b value
   -set option:filter:c value
The expert settings will override the internal defaults for the given filter
when it is used by the resizing operator. As such the order of the options
does not matter, as long as they have all been set before the operator is
used.
To the right is a table of the B,C values for the four defined Cubic Filters.
If one of the 'b' or 'c' settings is not "-set" its value will be calculated
from the other value on the assumption that you are wanting a 'Keys' family
filter (along the dotted line in the Mitchell-Netravali Survey diagram).
Remember the 'c' is equivalent to the Keys α
setting, while 'b' could be thought of as a cubic filter 'blur'
setting.
| |
| Filter | B
blur |
C
Keys α |
|---|
| Mitchell | 1/3 | 1/3 |
| Catrom | 0.0 | 1/2 |
| Cubic | 1.0 | 0.0 |
| Hermite | 0.0 | 0.0 |
|
|
The 'Parzen' windowing filter also uses the 'Cubic'
filter as its windowing function. As such you can re-define this windowing
filter in terms of B,C expert options. You may however have to adjust the
'win-suport' expert option if you plan to do this. How useful this is, and
what effect it has on the resulting windowed Sinc, is unknown.
|
Expert Filter Options
In the various sections above I introduce a large number of special 'expert'
options which will allow you to control the various filters, using "
-set".
Now while they are available. I would like to make one final point.
Unless you are an expert (or just playing) -- Do NOT use them!
They are for people who are expert at image processing, and unless you know
exactly what they do and how it effects the filtering operation, all you are
likely to do destroy the effectiveness of a image processing operator.
Here is a quick list of all expert settings (use at own risk)...
-set option:filter:filter  {filter-type}
   Expert Only
   Override the main filter weighting function being used
   If no 'option:filter:window' is set a 'Box' windowing function will
   also be automatically set, to provide 'raw' access to the filter
   function you have specified.

   For example a 'Raw 8 lobed Sinc' filter can be set using...
     -set option:filter:filter  Sinc
     -set option:filter:lobes   8

   To use the Blackman windowing function directly as a filter
   (just as IM use to do, by mistake, before v6.3.6-3)
     -set option:filter:filter  Blackman
     -set option:filter:support 4.0

-set option:filter:window  {filter-type}
   Expert Only
   Use this filter as the windowing function for Sinc/Bessel,
   The filter weighting function is automatically set to Sinc/Bessel
   unless a specific 'option:filter:filter' has also been set (see above).

   For example a 'Lanczos' filter (Sinc-Windowed-Sinc) is really...
     -set option:filter:window Sinc
     -set option:filter:lobes  3
   Note the 'filter' function defaults to 'Sinc' for orthogonal resizes.

-set option:filter:blur  {multiplier}
   Multiply the support windows and filter function by this multiplier
   Less than 1.0 shrinks filter usually (not always) making it sharper
   while more than 1.0 will makes a more blurry filter.
   It is best limit its use to Interpolated, or Gaussian-like filters.

   For example a 'less blurry' Gaussian-like filter...
     -filter Cubic
     -set option:filter:blur  0.7

-set option:filter:lobes  {integer}
   Set an integer 'support' size for the current filter, except when used from
   a cylindrical or radially filtering operator (like "-distort", which uses a
   Windowed-Bessel filter!  In that case the correct support for that many
   Jinc() function 'lobes' is looked up from a internal table of the first 20
   (zero crossing settings).

   For example an 8 lobed 'Lanczos' filter...
     -filter Lanczos
     -set option:filter:lobes   8

   For example an Lagrange-5 filter (lagrange order = support*2 -1)
    -filter Lagrange
    -set option:filter:lobes 3

-set option:filter:support {float}
   Force the filter to be clipped to just this support window range.
   Any setting less than 0.5 forces the use of 'Point' filter.

   For example an Lagrange-4 filter
    -filter Lagrange
    -set option:filter:support 2.5

-set option:filter:win-support {float}
   Expert Only
   A method of improve the speed of large support windowed filters.

   If unset it defaults to the appropriate 'support' setting.  If set the
   windowing function will use this support size rather than the normal
   support window, without adjusting the windowing functions effect on the
   filter function.  This can be used to create a large window function
   support, but then clip it to a much smaller actual processing support size,
   to remove the low contribution 'tail' end of the resulting windowed-sinc
   function.

   For example a 12 lobed 'Lanczos' windowed filter clipped to just
   the first 8 lobes of the resulting windowed filter...
      -filter Lanczos
      -set option:filter:win-support 12
      -set option:filter:lobes       8
   This makes it about four times faster, by ignoring the 'tail' of the
   resulting windowed-sinc filter but may have some minor artifacts as a
   result.

-set option:filter:b {float}
-set option:filter:c {float}
   Expert Only
   Override the preset B,C values for a given Cubic type of filter.
   If only one option is set the other is calculated to produce a 'Keys'
   filter.    B = B-Spline 'blurriness'  C = Keys α value

   For example, Try a different filter from the 'Mitchell-Netravali' survey.
     -filter Cubic
     -set option:filter:b .5
     -set option:filter:c .5

   Or specify a 'keys' filter according to the keys α value...
     -filter Cubic
     -set option:filter:c .4

-set option:filter:verbose 1
   Debugging/Graphing Only
   If set (any value), a table of the values of the resulting filter is output
   to standard output from 0.0 to support in .01 increments. This data is
   what was used to generate the graphs shown above for specific filters,
   after all the factors have been calculated and adjusted.  A comment is also
   included indicating the actual 'support window' of the filter, after any
   adjustment by the 'filter:blur' expert setting.

   Extract the data of a Welsh Windowed Sinc Filter...
       convert xc: -filter Welsh -set option:filter:verbose 1 \
               -resize 200% null:  > filter_welsh.dat
   Or the raw Welsh Windowing Function  that the above used
       convert xc: -set option:filter:filter Box \
                   -set option:filter:window Welsh \
                   -set option:filter:support 1.0 \
                   -set option:filter:verbose 1 \
               -resize 200% null:  > window_welsh.dat
   and plot it...
        gnuplot
           plot "window_welsh.dat" using lines
Any use of the expert options are at your own risk. They are not meant for
production use, but as a method for exploring or producing tricky or otherwise
impossible resize functions. Use at your own peril!
The "
-filter" setting is
in fact only used to lookup and set the appropriate settings to define the
given 'named' resize filter. The above settings will then override those
default values as appropriate, at the time a resize operator sets up the
filter for a specific resize or distortion image processing operation.
|
The "-filter" setting
'Point' completely bypasses all the above filter setup, and degenerates into
a unscaled 'Nearest Neighbor' direct lookup (resize), or interpolated lookup
(distort). Thus this named filter setting effectively turns off the scaled
image lookup filter completely.
|
|
The 'b' and 'c' expert filter settings only work when a cubic filter is in
use, which actually also includes the 'Parzen' cubic windowing function. It
is not posible to use a cubic 'Parzen' window function with a 'Cubic' filter
function, as this will result in the same cubic curve. Not that that really
makes any sense any way.
|
Summary of Resize Filters
The following is my own personal views after studying, recoding, and
documenting all the above filters available in ImageMagick. If you think I
may be wrong or like to express your opinion, I insight you to express you
views on the IM forum, and invite me to respond.
Interpolation Filters, such as
'
Hermite', are ideal when greatly enlarging images, producing a
minimum of blur in the final result, though the output could often be
artificially sharpened more in post-processing.
Gaussian-like Blurring Filters, such as
'
Mitchell', work best for images which basically consist of line
drawings and cartoon like images. You can control the
blurring versus the
aliasing effects of the
filter on the image using the special
Filter Blur
Setting.
Windowed Sinc/Bessel Filters, and the
Lagrange equivalent are the best filter to use with
real-world images, and especially when shrinking images. All of them are very
similar in basic results. A larger support or better still, lobe count,
setting will generally produce a even better result, though you may get more
ringing effects as well, but at a higher calculation
cost.
The
Cubic Filters are a mixed bag of fast and
simple filters, of fixed support (usually 2.0) which produces everything from
the '
Hermite' smooth interpolation filter, the qualitatively
assessed '
Mitchell' for image enlargements, the very blurry
Gaussian-like '
Cubic' filter, or a sharp, windowed-sinc type of
filter using '
Catrom'.
Generally if the resize results are acceptable as is, leave things alone,
as you are more likely to make things worse, not better.
Filter Comparison
Enlargement
To give a final comparison, here I present a selection of 12 representative
resize filters. The image is an enlargement of a aliased step in a one pixel
wide line, on a dark gray background. The original image itself 'aliased' so
you should be able to see how well various filters remove any existing
aliasing effects.
  convert -size 10x6 xc:grey20 +antialias -draw 'fill white line 4,0 5,5' \
          -filter {filter_type} -resize 100x   {result}
|
![[IM Output]](montage_enlarge.png)
The above starts with the
Interpolated
Filters and continues with the
Gaussian
Blurring Filters, showing how much blurring these filters produce, and in
doing so remove the 'aliasing' in the original image. No ringing is produced
by these filters.
The second line starts with three
Windowed Sinc
Filters showing the heavy ringing effects they can produce. Remember these
filters are really design for shrinking images, not enlarging. This continues
into the '
Lagrange' using its default 'interpolating' setting,
and '
Catrom' interpolated cubic filter.
The final image is the '
Mitchell' filter showing what the
'experts' subjectively agreed was the best 'ideal' filter to use for
enlarging images, with a minimal of all four
Resize
Artifacts present in the final result.
I myself agree with there findings, but only for enlargements.
This is why '
Mitchell' is the default 'enlargement' filter used by
IM.
Shrinking
To get an idea of the
aliasing effects, here I shrink
the crop of
Large Rings Image that we made
earlier (
105x105 pixels in size), to see what sort of
Moiré effects each of the same 12 representative filters generates.
convert rings_crop.png -filter {filter_type} -resize 100x {result}
|
![[IM Output]](montage_shrink.png)
As you can see
Interpolated Filters filters
are very heavily aliased. On the other hand the blurring effects of the
Gaussian Blurring Filters tend to remove the
Moiré effects from the resulting image, though with a general blurring
of the resulting image. The '
Gaussian'
Filter itself does show a barely noticeable aliasing effect caused by its
infinite (IIR) filter being clipped by the
Filter
Support Setting (at a size of 1.5), but that is very minor.
On the other hand the
Windowed Sinc Filters
produce a very sharp looking image with only a very light circular morié
effect, of about equal intensity across all three representative filters.
This is probably a 'display' effect rather than a resize filter effect.
Finally the other cubic filters also show some morié effect,s with the
'
Mitchell' showing the least effect, presumably because of the
slight blurring that it has incorporated into the filter.
Here is another comparison, but this time heavily shrinking a
Smaller Rings Image smaller.
convert rings_sm_orig.gif -filter {filter_type} -resize 100x {result}
|
![[IM Output]](montage_smaller.png)
As you can see the
Interpolated Filters
produce lots of
aliasing artifacts, while the
Gaussian Blurring Filters tend to blur out more
lines than the others. But all the other filters tend to produce a reasonable
job.
The Best Filter?
That is something you will need to work out yourself. Often however it depends
on what type of image and resizing you are doing.
For enlarging images '
Mitchell' is probably about the best filter
you can use, while basically any of the
Windowed
Filters (default is '
Lanczos') is good for shrinking images,
especially when some type of low level pattern is involved. However if you
have no patterns, but lots of straight edges (such as GIF transparency), you
may be better using sharpened
Gaussian Filter
or again a '
Mitchell', so as to avoid strong ringing effects.
The '
Lagrange' filter is also quite good especially with a larger
Filter Support Setting, for shrinking images.
The choice is yours, and choice is a key feature of ImageMagick.
IM's Defaults...
It is for these reasons that '
Mitchell' is the default filter
for enlargement, and for shrinking images involving transparency. However the
'
Lanczos' will be used for shrinking when no-transparency is
involved.
Created: 15 March 2004
Updated: 4 February 2008
Author: Anthony Thyssen,
<A.Thyssen@griffith.edu.au>
Examples Generated with:
![[version image]](version.gif)
URL: http://www.imagemagick.org/Usage/resize/

![[IM Output]](animate_lqr.gif)
![[IM Output]](rings_sample.png)
![[IM Output]](rings_scale.png)
![[IM Output]](rings_resize.png)
![[IM Output]](graph_filter_box.jpg) Here is a graph of the filters weighting function, from which you can see why
it is called a '
Here is a graph of the filters weighting function, from which you can see why
it is called a '![[IM Output]](checks_box+1.gif)
![[IM Output]](checks_box+2.gif)
![[IM Output]](checks_box+3.gif)
![[IM Output]](graph_filter_triangle.jpg) The 'Triangle' or '
The 'Triangle' or '![[IM Output]](graph_interpolation.jpg) To the right I have graphed the various interpolation filters, except for
'
To the right I have graphed the various interpolation filters, except for
'![[IM Output]](graph_lagrange_interpolate.jpg) The '
The '![[IM Output]](graph_filter_catrom.jpg) The '
The '![[IM Output]](graph_filter_gaussian.jpg) The Gaussian filter is a very special filter that generates that same
'bell curve' shape in the frequency domain. This makes it very useful as an
image filter as it guarantees a good removal of this high frequency noise in a
highly controllable way.
However if you examine the filter graph, you will see that at a distance of
one pixel from the sampling point, you have a non-zero value. In fact it is
quite a high value indeed. This results in a huge amount of blurring of the
individual pixels, even when no resize is actually performed. In fact you
would get the same result as a Blur operator.
For example here I have resized the standard IM logo, using a Gaussian filter
and again using the normal IM filter ('
The Gaussian filter is a very special filter that generates that same
'bell curve' shape in the frequency domain. This makes it very useful as an
image filter as it guarantees a good removal of this high frequency noise in a
highly controllable way.
However if you examine the filter graph, you will see that at a distance of
one pixel from the sampling point, you have a non-zero value. In fact it is
quite a high value indeed. This results in a huge amount of blurring of the
individual pixels, even when no resize is actually performed. In fact you
would get the same result as a Blur operator.
For example here I have resized the standard IM logo, using a Gaussian filter
and again using the normal IM filter ('![[IM Output]](graph_gaussian.jpg) If you study the comparative graphs to the right you will see that
'
If you study the comparative graphs to the right you will see that
'![[IM Output]](graph_filter_gaussian_1.25.jpg) If you really want, you can change the 'support' of a filter using the special
expert setting "
If you really want, you can change the 'support' of a filter using the special
expert setting "![[IM Profile]](plot_gaussian.gif)
![[IM Output]](graph_sinc_jinc.jpg) Here is a graph of these two infinite weighting functions.
The Sinc() being mathematically perfect has some special features that
I would like to point out. First at every integer distance from the weighting
function for the filter becomes zero. This is as mentioned before very
important as it means that the filter does not blur the image more than
necessary (unlike Gaussian Filters).
The other major difference between this and previous filters is that some of
the weightings have negative effects. That is they will subtract some of the
nearby color pixels from the final color in each pixel in the image. This
may seem a little strange but it results in a very strong sharpening of the
edges of objects. Unfortunately any negative weights need to be offset by
positive weights which produces the wave like function you see. This in turn
causes ringing artifacts in images which contain lots
of sharp boundaries such as line drawings if the filter is
applied improperly.
The Jinc() function (more commonly known as a '
Here is a graph of these two infinite weighting functions.
The Sinc() being mathematically perfect has some special features that
I would like to point out. First at every integer distance from the weighting
function for the filter becomes zero. This is as mentioned before very
important as it means that the filter does not blur the image more than
necessary (unlike Gaussian Filters).
The other major difference between this and previous filters is that some of
the weightings have negative effects. That is they will subtract some of the
nearby color pixels from the final color in each pixel in the image. This
may seem a little strange but it results in a very strong sharpening of the
edges of objects. Unfortunately any negative weights need to be offset by
positive weights which produces the wave like function you see. This in turn
causes ringing artifacts in images which contain lots
of sharp boundaries such as line drawings if the filter is
applied improperly.
The Jinc() function (more commonly known as a '![[IM Output]](graph_sinc_windowing.jpg) For example, the graph to the right shows three functions (click to get an
enlarged view). The red function is the mathematically ideal Sinc()
function, which stretches off to infinity. The green function is a "Hanning"
windowing function (based on a simple Cosine() curve . This is multiplied
with the Sinc() to modulate the more distant components of the filter,
reaching zero (or near zero) at the edge of the support window (typically 4.0
in ImageMagick).
Basically by selecting '
For example, the graph to the right shows three functions (click to get an
enlarged view). The red function is the mathematically ideal Sinc()
function, which stretches off to infinity. The green function is a "Hanning"
windowing function (based on a simple Cosine() curve . This is multiplied
with the Sinc() to modulate the more distant components of the filter,
reaching zero (or near zero) at the edge of the support window (typically 4.0
in ImageMagick).
Basically by selecting '![[IM Output]](graph_windowing.jpg) To the left is a graph of all the various windowing functions that IM has
available at the time of writing. Yes there are a lot of them as windowing
functions have been the subject of intense study by numerous signal processing
experts.
To the left is a graph of all the various windowing functions that IM has
available at the time of writing. Yes there are a lot of them as windowing
functions have been the subject of intense study by numerous signal processing
experts. ![[IM Output]](graph_windowed_sinc.jpg) And to the left is the resulting windowed-sinc filters that would be used by
selecting those window functions. All of the windowed filter functions will
generally use a support of 4.0 for Sinc (4 lobes) and 3.238 for Bessel (3
lobes). The '
And to the left is the resulting windowed-sinc filters that would be used by
selecting those window functions. All of the windowed filter functions will
generally use a support of 4.0 for Sinc (4 lobes) and 3.238 for Bessel (3
lobes). The '![[IM Output]](graph_lanczos_lobes.jpg) For example to the left I have graphed the '
For example to the left I have graphed the '![[IM Output]](graph_lagrange_windowed.jpg) With larger support settings, the
'
With larger support settings, the
'![[IM Output]](graph_lagrange_even.jpg) The other half-integer support, Lagrange Filters (generating even orders),
produce a very disjoint set of filter weightings, and much like the
'
The other half-integer support, Lagrange Filters (generating even orders),
produce a very disjoint set of filter weightings, and much like the
'![[IM Output]](graph_cubics.jpg) Shown in the graph left are four such 'smooth' cubic filters that are
pre-defined within IM, and well known for use as resize filters.
The '
Shown in the graph left are four such 'smooth' cubic filters that are
pre-defined within IM, and well known for use as resize filters.
The '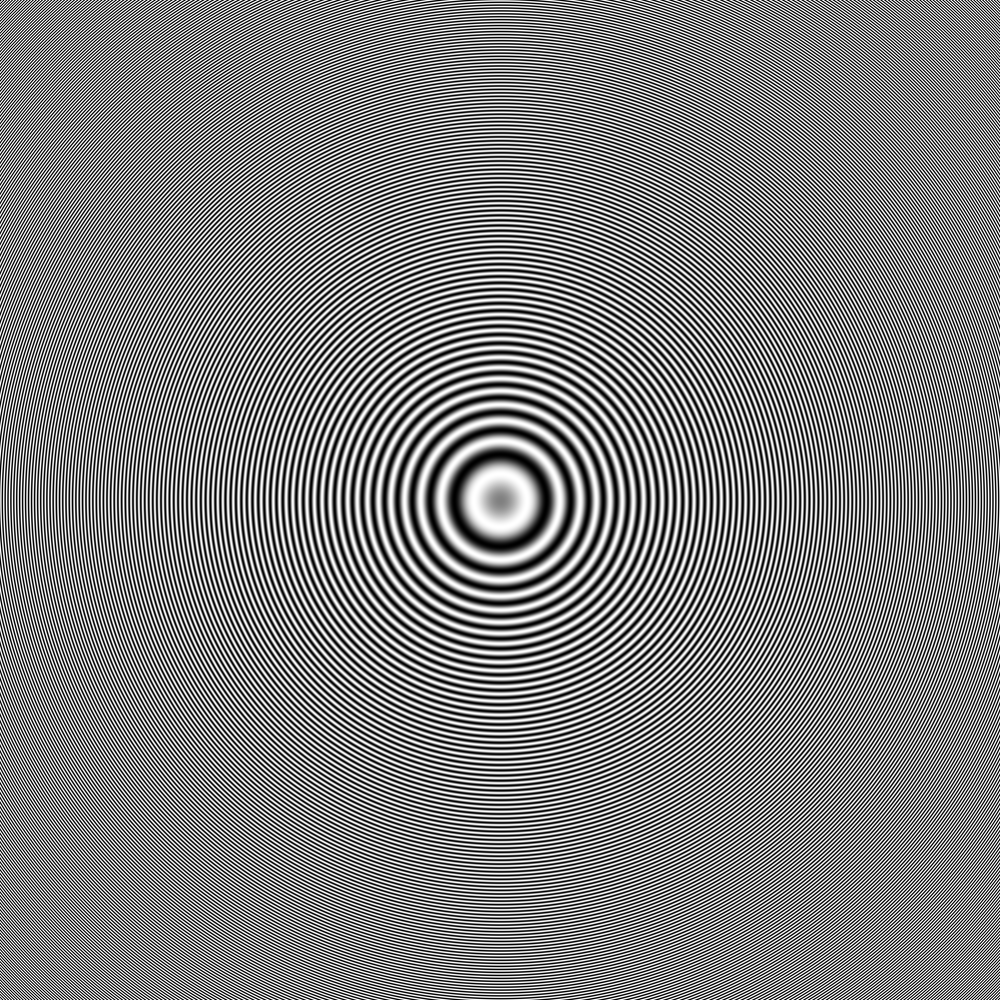