2.4. Starting the Installation

Important:

By default, the installation will not make any changes to your disk(s) until you see the following message:

Your changes will now be written to disk.  If you
have chosen to overwrite existing data, it will
be PERMANENTLY ERASED. Are you sure you want to
commit your changes?

The install can be exited at any time prior to this warning without changing the contents of the hard drive. If you are concerned that you have configured something incorrectly you can just turn the computer off before this point, and no damage will be done.

2.4.1. Booting

2.4.1.1. Booting on i386™ and amd64

  1. If you prepared a bootable USB stick, as described in Section 2.3.5, “Prepare the Installation Media”, then plug in your USB stick before turning on the computer.

    If you are booting from CDROM, then you will need to turn on the computer, and insert the CDROM at the first opportunity.

  2. Configure your machine to boot from either the CDROM or from USB, depending on the media being used for the installation. BIOS configurations allow the selection of a specific boot device. Most systems also provide for selecting a boot device during startup, typically by pressing F10, F11, F12, or Escape.

  3. If your computer starts up as normal and loads your existing operating system, then either:

    1. The disks were not inserted early enough in the boot process. Leave them in, and try restarting your computer.

    2. The BIOS changes earlier did not work correctly. You should redo that step until you get the right option.

    3. Your particular BIOS does not support booting from the desired media. The Plop Boot Manager can be used to boot older computers from CD or USB media.

  4. FreeBSD will start to boot. If you are booting from CDROM you will see a display similar to this (version information omitted):

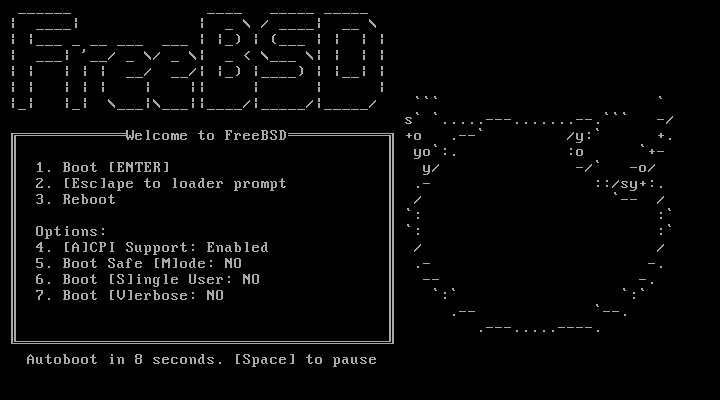
    Booting from CD-ROM... 645MB medium detected CD Loader 1.2 Building the boot loader arguments Looking up /BOOT/LOADER... Found Relocating the loader and the BTX Starting the BTX loader BTX loader 1.00 BTX version is 1.02 Consoles: internal video/keyboard BIOS CD is cd0 BIOS drive C: is disk0 BIOS drive D: is disk1 BIOS 636kB/261056kB available memory FreeBSD/i386 bootstrap loader, Revision 1.1 Loading /boot/defaults/loader.conf /boot/kernel/kernel text=0x64daa0 data=0xa4e80+0xa9e40 syms=[0x4+0x6cac0+0x4+0x88e9d] \
  5. The FreeBSD boot loader is displayed:

    Figure 2.1. FreeBSD Boot Loader Menu
    FreeBSD Boot Loader Menu

    Either wait ten seconds, or press Enter.

2.4.1.2. Booting for Macintosh® PowerPC®

On most machines, holding C on the keyboard during boot will boot from the CD. Otherwise, hold Command+Option+O+F, or Windows+Alt+O+F on non-Apple® keyboards. At the 0 > prompt, enter

boot cd:,\ppc\loader cd:0

For Xserves without keyboards, see Apple®'s support web site about booting into Open Firmware.

2.4.1.3. Booting for SPARC64®

Most SPARC64® systems are set up to boot automatically from disk. To install FreeBSD, you need to boot over the network or from a CDROM, which requires you to break into the PROM (OpenFirmware).

To do this, reboot the system, and wait until the boot message appears. It depends on the model, but should look about like:

Sun Blade 100 (UltraSPARC-IIe), Keyboard Present Copyright 1998-2001 Sun Microsystems, Inc. All rights reserved. OpenBoot 4.2, 128 MB memory installed, Serial #51090132. Ethernet address 0:3:ba:b:92:d4, Host ID: 830b92d4.

If your system proceeds to boot from disk at this point, you need to press L1+A or Stop+A on the keyboard, or send a BREAK over the serial console (using for example ~# in tip(1) or cu(1)) to get to the PROM prompt. It looks like this:

ok 1 ok {0} 2

1

This is the prompt used on systems with just one CPU.

2

This is the prompt used on SMP systems, the digit indicates the number of the active CPU.

At this point, place the CDROM into your drive, and from the PROM prompt, type boot cdrom.

2.4.2. Reviewing the Device Probe Results

The last few hundred lines that have been displayed on screen are stored and can be reviewed.

To review the buffer, press Scroll Lock. This turns on scrolling in the display. You can then use the arrow keys, or PageUp and PageDown to view the results. Press Scroll Lock again to stop scrolling.

Do this now, to review the text that scrolled off the screen when the kernel was carrying out the device probes. You will see text similar to Figure 2.2, “Typical Device Probe Results”, although the precise text will differ depending on the devices that you have in your computer.

Figure 2.2. Typical Device Probe Results
Copyright (c) 1992-2011 The FreeBSD Project. Copyright (c) 1979, 1980, 1983, 1986, 1988, 1989, 1991, 1992, 1993, 1994 The Regents of the University of California. All rights reserved. FreeBSD is a registered trademark of The FreeBSD Foundation. FreeBSD 9.0-RELEASE #0 r225473M: Sun Sep 11 16:07:30 BST 2011 root@psi:/usr/obj/usr/src/sys/GENERIC amd64 CPU: Intel(R) Core(TM)2 Duo CPU T9400 @ 2.53GHz (2527.05-MHz K8-class CPU) Origin = "GenuineIntel" Id = 0x10676 Family = 6 Model = 17 Stepping = 6 Features=0xbfebfbff<FPU,VME,DE,PSE,TSC,MSR,PAE,MCE,CX8,APIC,SEP,MTRR,PGE,MCA,CMOV,PAT,PSE36,CLFLUSH,DTS,ACPI,MMX,FXSR,SSE,SSE2,SS,HTT,TM,PBE> Features2=0x8e3fd<SSE3,DTES64,MON,DS_CPL,VMX,SMX,EST,TM2,SSSE3,CX16,xTPR,PDCM,SSE4.1> AMD Features=0x20100800<SYSCALL,NX,LM> AMD Features2=0x1<LAHF> TSC: P-state invariant, performance statistics real memory = 3221225472 (3072 MB) avail memory = 2926649344 (2791 MB) Event timer "LAPIC" quality 400 ACPI APIC Table: <TOSHIB A0064 > FreeBSD/SMP: Multiprocessor System Detected: 2 CPUs FreeBSD/SMP: 1 package(s) x 2 core(s) cpu0 (BSP): APIC ID: 0 cpu1 (AP): APIC ID: 1 ioapic0: Changing APIC ID to 1 ioapic0 <Version 2.0> irqs 0-23 on motherboard kbd1 at kbdmux0 acpi0: <TOSHIB A0064> on motherboard acpi0: Power Button (fixed) acpi0: reservation of 0, a0000 (3) failed acpi0: reservation of 100000, b6690000 (3) failed Timecounter "ACPI-safe" frequency 3579545 Hz quality 850 acpi_timer0: <24-bit timer at 3.579545MHz> port 0xd808-0xd80b on acpi0 cpu0: <ACPI CPU> on acpi0 ACPI Warning: Incorrect checksum in table [ASF!] - 0xFE, should be 0x9A (20110527/tbutils-282) cpu1: <ACPI CPU> on acpi0 pcib0: <ACPI Host-PCI bridge> port 0xcf8-0xcff on acpi0 pci0: <ACPI PCI bus> on pcib0 vgapci0: <VGA-compatible display> port 0xcff8-0xcfff mem 0xff400000-0xff7fffff,0xe0000000-0xefffffff irq 16 at device 2.0 on pci0 agp0: <Intel GM45 SVGA controller> on vgapci0 agp0: aperture size is 256M, detected 131068k stolen memory vgapci1: <VGA-compatible display> mem 0xffc00000-0xffcfffff at device 2.1 on pci0 pci0: <simple comms> at device 3.0 (no driver attached) em0: <Intel(R) PRO/1000 Network Connection 7.2.3> port 0xcf80-0xcf9f mem 0xff9c0000-0xff9dffff,0xff9fe000-0xff9fefff irq 20 at device 25.0 on pci0 em0: Using an MSI interrupt em0: Ethernet address: 00:1c:7e:6a:ca:b0 uhci0: <Intel 82801I (ICH9) USB controller> port 0xcf60-0xcf7f irq 16 at device 26.0 on pci0 usbus0: <Intel 82801I (ICH9) USB controller> on uhci0 uhci1: <Intel 82801I (ICH9) USB controller> port 0xcf40-0xcf5f irq 21 at device 26.1 on pci0 usbus1: <Intel 82801I (ICH9) USB controller> on uhci1 uhci2: <Intel 82801I (ICH9) USB controller> port 0xcf20-0xcf3f irq 19 at device 26.2 on pci0 usbus2: <Intel 82801I (ICH9) USB controller> on uhci2 ehci0: <Intel 82801I (ICH9) USB 2.0 controller> mem 0xff9ff800-0xff9ffbff irq 19 at device 26.7 on pci0 usbus3: EHCI version 1.0 usbus3: <Intel 82801I (ICH9) USB 2.0 controller> on ehci0 hdac0: <Intel 82801I High Definition Audio Controller> mem 0xff9f8000-0xff9fbfff irq 22 at device 27.0 on pci0 pcib1: <ACPI PCI-PCI bridge> irq 17 at device 28.0 on pci0 pci1: <ACPI PCI bus> on pcib1 iwn0: <Intel(R) WiFi Link 5100> mem 0xff8fe000-0xff8fffff irq 16 at device 0.0 on pci1 pcib2: <ACPI PCI-PCI bridge> irq 16 at device 28.1 on pci0 pci2: <ACPI PCI bus> on pcib2 pcib3: <ACPI PCI-PCI bridge> irq 18 at device 28.2 on pci0 pci4: <ACPI PCI bus> on pcib3 pcib4: <ACPI PCI-PCI bridge> at device 30.0 on pci0 pci5: <ACPI PCI bus> on pcib4 cbb0: <RF5C476 PCI-CardBus Bridge> at device 11.0 on pci5 cardbus0: <CardBus bus> on cbb0 pccard0: <16-bit PCCard bus> on cbb0 isab0: <PCI-ISA bridge> at device 31.0 on pci0 isa0: <ISA bus> on isab0 ahci0: <Intel ICH9M AHCI SATA controller> port 0x8f58-0x8f5f,0x8f54-0x8f57,0x8f48-0x8f4f,0x8f44-0x8f47,0x8f20-0x8f3f mem 0xff9fd800-0xff9fdfff irq 19 at device 31.2 on pci0 ahci0: AHCI v1.20 with 4 3Gbps ports, Port Multiplier not supported ahcich0: <AHCI channel> at channel 0 on ahci0 ahcich1: <AHCI channel> at channel 1 on ahci0 ahcich2: <AHCI channel> at channel 4 on ahci0 acpi_lid0: <Control Method Lid Switch> on acpi0 battery0: <ACPI Control Method Battery> on acpi0 acpi_button0: <Power Button> on acpi0 acpi_acad0: <AC Adapter> on acpi0 acpi_toshiba0: <Toshiba HCI Extras> on acpi0 acpi_tz0: <Thermal Zone> on acpi0 attimer0: <AT timer> port 0x40-0x43 irq 0 on acpi0 Timecounter "i8254" frequency 1193182 Hz quality 0 Event timer "i8254" frequency 1193182 Hz quality 100 atkbdc0: <Keyboard controller (i8042)> port 0x60,0x64 irq 1 on acpi0 atkbd0: <AT Keyboard> irq 1 on atkbdc0 kbd0 at atkbd0 atkbd0: [GIANT-LOCKED] psm0: <PS/2 Mouse> irq 12 on atkbdc0 psm0: [GIANT-LOCKED] psm0: model GlidePoint, device ID 0 atrtc0: <AT realtime clock> port 0x70-0x71 irq 8 on acpi0 Event timer "RTC" frequency 32768 Hz quality 0 hpet0: <High Precision Event Timer> iomem 0xfed00000-0xfed003ff on acpi0 Timecounter "HPET" frequency 14318180 Hz quality 950 Event timer "HPET" frequency 14318180 Hz quality 450 Event timer "HPET1" frequency 14318180 Hz quality 440 Event timer "HPET2" frequency 14318180 Hz quality 440 Event timer "HPET3" frequency 14318180 Hz quality 440 uart0: <16550 or compatible> port 0x3f8-0x3ff irq 4 flags 0x10 on acpi0 sc0: <System console> at flags 0x100 on isa0 sc0: VGA <16 virtual consoles, flags=0x300> vga0: <Generic ISA VGA> at port 0x3c0-0x3df iomem 0xa0000-0xbffff on isa0 ppc0: cannot reserve I/O port range est0: <Enhanced SpeedStep Frequency Control> on cpu0 p4tcc0: <CPU Frequency Thermal Control> on cpu0 est1: <Enhanced SpeedStep Frequency Control> on cpu1 p4tcc1: <CPU Frequency Thermal Control> on cpu1 Timecounters tick every 1.000 msec hdac0: HDA Codec #0: Realtek ALC268 hdac0: HDA Codec #1: Lucent/Agere Systems (Unknown) pcm0: <HDA Realtek ALC268 PCM #0 Analog> at cad 0 nid 1 on hdac0 pcm1: <HDA Realtek ALC268 PCM #1 Analog> at cad 0 nid 1 on hdac0 usbus0: 12Mbps Full Speed USB v1.0 usbus1: 12Mbps Full Speed USB v1.0 usbus2: 12Mbps Full Speed USB v1.0 usbus3: 480Mbps High Speed USB v2.0 ugen0.1: <Intel> at usbus0 uhub0: <Intel UHCI root HUB, class 9/0, rev 1.00/1.00, addr 1> on usbus0 ugen1.1: <Intel> at usbus1 uhub1: <Intel UHCI root HUB, class 9/0, rev 1.00/1.00, addr 1> on usbus1 ugen2.1: <Intel> at usbus2 uhub2: <Intel UHCI root HUB, class 9/0, rev 1.00/1.00, addr 1> on usbus2 ugen3.1: <Intel> at usbus3 uhub3: <Intel EHCI root HUB, class 9/0, rev 2.00/1.00, addr 1> on usbus3 uhub0: 2 ports with 2 removable, self powered uhub1: 2 ports with 2 removable, self powered uhub2: 2 ports with 2 removable, self powered uhub3: 6 ports with 6 removable, self powered ugen2.2: <vendor 0x0b97> at usbus2 uhub8: <vendor 0x0b97 product 0x7761, class 9/0, rev 1.10/1.10, addr 2> on usbus2 ugen1.2: <Microsoft> at usbus1 ada0 at ahcich0 bus 0 scbus1 target 0 lun 0 ada0: <Hitachi HTS543225L9SA00 FBEOC43C> ATA-8 SATA 1.x device ada0: 150.000MB/s transfers (SATA 1.x, UDMA6, PIO 8192bytes) ada0: Command Queueing enabled ada0: 238475MB (488397168 512 byte sectors: 16H 63S/T 16383C) ada0: Previously was known as ad4 ums0: <Microsoft Microsoft 3-Button Mouse with IntelliEyeTM, class 0/0, rev 1.10/3.00, addr 2> on usbus1 SMP: AP CPU #1 Launched! cd0 at ahcich1 bus 0 scbus2 target 0 lun 0 cd0: <TEAC DV-W28S-RT 7.0C> Removable CD-ROM SCSI-0 device cd0: 150.000MB/s transfers (SATA 1.x, ums0: 3 buttons and [XYZ] coordinates ID=0 UDMA2, ATAPI 12bytes, PIO 8192bytes) cd0: cd present [1 x 2048 byte records] ugen0.2: <Microsoft> at usbus0 ukbd0: <Microsoft Natural Ergonomic Keyboard 4000, class 0/0, rev 2.00/1.73, addr 2> on usbus0 kbd2 at ukbd0 uhid0: <Microsoft Natural Ergonomic Keyboard 4000, class 0/0, rev 2.00/1.73, addr 2> on usbus0 Trying to mount root from cd9660:/dev/iso9660/FREEBSD_INSTALL [ro]...

Check the probe results carefully to make sure that FreeBSD found all the devices you expected. If a device was not found, then it will not be listed. Kernel modules allows you to add in support for devices which are not in the GENERIC kernel.

After the procedure of device probing, you will see Figure 2.3, “Selecting Installation Media Mode”. The install media can be used in three ways: to install FreeBSD, as a live CD, or to simply access a FreeBSD shell. Use the arrow keys to choose an option, and Enter to select.
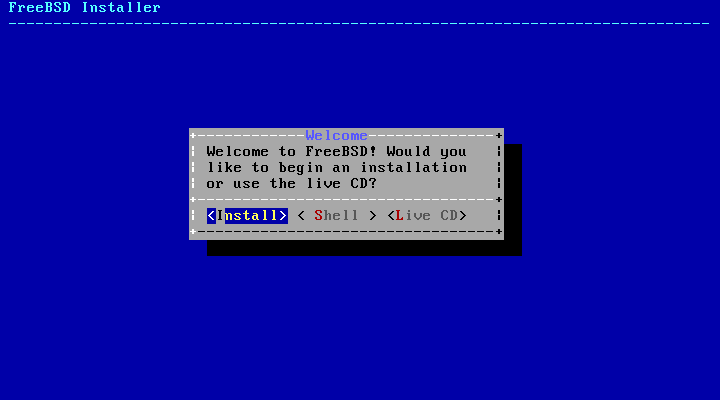
Figure 2.3. Selecting Installation Media Mode
Selecting Installation Media Mode

Selecting [ Install ] here will enter the installer.

All FreeBSD documents are available for download at http://ftp.FreeBSD.org/pub/FreeBSD/doc/

Questions that are not answered by the documentation may be sent to <freebsd-questions@FreeBSD.org>.

Send questions about this document to <freebsd-doc@FreeBSD.org>.