The first task is to allocate disk space for FreeBSD, and label that space so that sysinstall(8) can prepare it. In order to do this you need to know how FreeBSD expects to find information on the disk.
Before installing and configuring FreeBSD it is important to be aware how FreeBSD deals with BIOS drive mappings.
In a PC running a BIOS-dependent operating system such as Microsoft® Windows®, the BIOS is able to abstract the normal disk drive order and the operating system goes along with the change. This allows the user to boot from a disk drive other than the "primary master". This is especially convenient for users buy an identical second hard drive, and perform routine copies of the first drive to the second drive. If the first drive fails, is attacked by a virus, or is scribbled upon by an operating system defect, they can easily recover by instructing the BIOS to logically swap the drives. It is like switching the cables on the drives, without having to open the case.
Systems with SCSI controllers often include BIOS extensions which allow the SCSI drives to be re-ordered in a similar fashion for up to seven drives.
A user who is accustomed to taking advantage of these features may become surprised when the results with FreeBSD are not as expected. FreeBSD does not use the BIOS, and does not know the “logical BIOS drive mapping”. This can lead to perplexing situations, especially when drives are physically identical in geometry and have been made as data clones of one another.
When using FreeBSD, always restore the BIOS to natural drive numbering before installing FreeBSD, and then leave it that way. If drives need to be switched around, take the time to open the case and move the jumpers and cables.
After choosing to begin a standard installation in sysinstall(8), this message will appear:
Press Enter and
a list of all the hard drives that the kernel found when it
carried out the device probes will be displayed.
Figure 3.13, “Select Drive for FDisk” shows an example from a
system with two IDE disks called
ad0 and ad2.
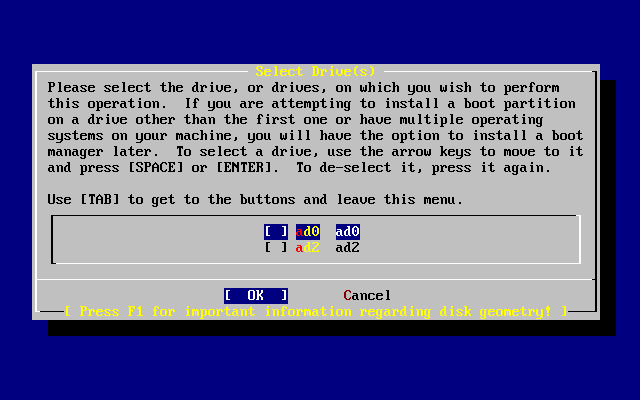
Note that ad1 is not
listed here.
Consider two IDE hard disks where one
is the master on the first IDE controller and one is the
master on
the second IDE controller. If FreeBSD numbered these as
ad0 and
ad1, everything would work.
But if a third disk is later added as the slave device on
the
first IDE controller, it would now be ad1,
and the previous ad1 would become
ad2. Because device names
are used to find filesystems,
some filesystems may no longer
appear correctly, requiring a change to the FreeBSD
configuration.
To work around this, the kernel can be configured to name IDE
disks based on where they are and not the order in which they
were
found. With this scheme, the master disk on the second IDE
controller will always be
ad2, even if there are no
ad0 or ad1
devices.
This configuration is the default for the FreeBSD kernel, which
is why the display in this example shows
ad0 and
ad2. The machine on which this screenshot
was taken had IDE disks on both master channels of the IDE
controllers and no disks on the slave channels.
Select the disk on which to install FreeBSD, and then press . FDisk will start, with a display similar to that shown in Figure 3.14, “Typical Default FDisk Partitions”.
The FDisk display is broken into three sections.
The first section, covering the first two lines of the display, shows details about the currently selected disk, including its FreeBSD name, the disk geometry, and the total size of the disk.
The second section shows the slices that are currently on the
disk, where they start and end, how large they are, the name FreeBSD
gives them, and their description and sub-type. This example shows two
small unused slices which are artifacts of disk layout schemes
on the
PC. It also shows one large FAT slice, which
appears as C: in
Windows®, and an extended slice, which may contain other
drive letters in Windows®.
The third section shows the commands that are available in FDisk.
This step varies, depending on how the disk is to be sliced.
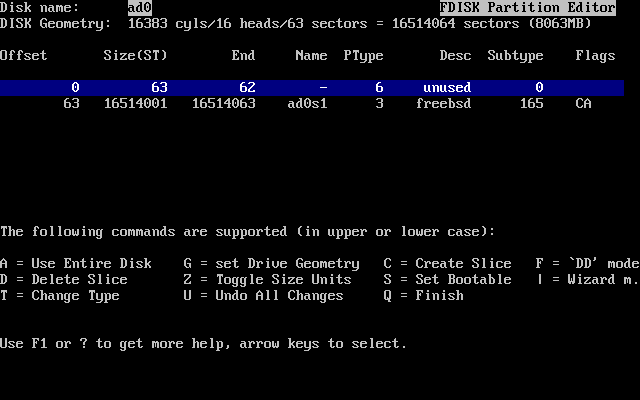
To install FreeBSD to the entire disk, which will delete
all the other data on this disk, press A,
which
corresponds to the option.
The existing slices will be removed and replaced with a small
area
flagged as unused
and one large slice for FreeBSD. Then,
select the newly created FreeBSD slice using the arrow
keys and press S to mark the slice as being
bootable. The screen will then look similar to
Figure 3.15, “Fdisk Partition Using Entire Disk”. Note the
A in the Flags column, which
indicates that this slice is active, and will be
booted from.
If an existing slice needs to be deleted to make space for FreeBSD, select the slice using the arrow keys and press D. Then, press C to be prompted for the size of the slice to create. Enter the appropriate value and press Enter. The default value in this box represents the largest possible slice to make, which could be the largest contiguous block of unallocated space or the size of the entire hard disk.
If you have already made space for FreeBSD then you can press C to create a new slice. Again, you will be prompted for the size of slice you would like to create.
When finished, press Q. Any changes will be saved in sysinstall(8), but will not yet be written to disk.
The next menu provides the option to install a boot manager. In general, install the FreeBSD boot manager if:
There is more than one drive and FreeBSD will be installed onto a drive other than the first one.
FreeBSD will be installed alongside another operating system on the same disk, and you want to choose whether to start FreeBSD or the other operating system when the computer starts.
If FreeBSD is going to be the only operating system on this machine, installed on the first hard disk, then the boot manager will suffice. Choose if using a third-party boot manager capable of booting FreeBSD.
Make a selection and press Enter.
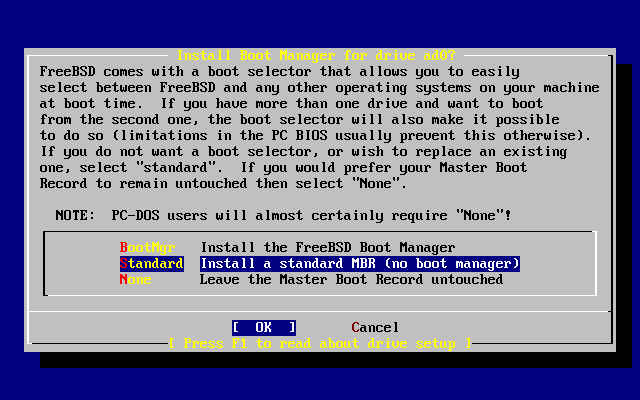
The help screen, reached by pressing F1, discusses the problems that can be encountered when trying to share the hard disk between operating systems.
If there is more than one drive, it will return to the Select Drives screen after the boot manager selection. To install FreeBSD on to more than one disk, select another disk and repeat the slice process using FDisk.
Important:
If installing FreeBSD on a drive other than the first drive, the FreeBSD boot manager needs to be installed on both drives.

Use Tab to toggle between the last drive selected, , and .
Press Tab once to toggle to , then press Enter to continue with the installation.
Next, create some partitions inside each slice.
Remember that each partition is lettered, from
a through to h, and that
partitions b, c, and
d have conventional meanings that should
be adhered
to.
Certain applications can benefit from particular partition schemes, especially when laying out partitions across more than one disk. However, for a first FreeBSD installation, do not give too much thought to how to partition the disk. It is more important to install FreeBSD and start learning how to use it. You can always re-install FreeBSD to change the partition scheme after becoming more familiar with the operating system.
The following scheme features four partitions: one for swap space and three for filesystems.
| Partition | Filesystem | Size | Description |
|---|---|---|---|
a | / | 1 GB | This is the root filesystem. Every other filesystem will be mounted somewhere under this one. 1 GB is a reasonable size for this filesystem as user files should not be stored here and a regular FreeBSD install will put about 128 MB of data here. |
b | N/A | 2-3 x RAM | The system's swap space is kept on the |
e | /var | 512 MB to 4096 MB | /var
contains
files that are constantly varying, such as
log files and other administrative files. Many
of these files are read from or written to extensively
during
FreeBSD's day-to-day running. Putting these files on another
filesystem allows FreeBSD to optimize the access of these
files without affecting other files in other directories that
do not have the same access pattern. |
f | /usr | Rest of disk (at least 8 GB) | All other files will typically be stored in
/usr and its
subdirectories. |
Warning:
The values above are given as example and should be used
by experienced users only. Users are encouraged to use the
automatic partition layout called Auto
Defaults by the FreeBSD partition editor.
If installing FreeBSD on to more than one disk, create partitions in the other configured slices. The easiest way to do this is to create two partitions on each disk, one for the swap space, and one for a filesystem.
| Partition | Filesystem | Size | Description |
|---|---|---|---|
b | N/A | See description | Swap space can be split across
each disk. Even though the a partition is
free, convention dictates that swap space stays on the
b partition. |
e | /diskn | Rest of disk | The rest of the disk is taken up with one big partition.
This could easily be put on the a
partition, instead of the e partition.
However, convention says that the a
partition on a slice is reserved for the filesystem that will
be the root (/)
filesystem. Following
this convention is not necessary, but
sysinstall(8) uses it, so following it
makes the installation slightly cleaner.
This filesystem can be mounted anywhere; this example
mounts it as
/disk,
where
n is a number that changes for each
disk. |
Having chosen the partition layout, create it using sysinstall(8).
Press Enter to start the FreeBSD partition editor, called Disklabel.
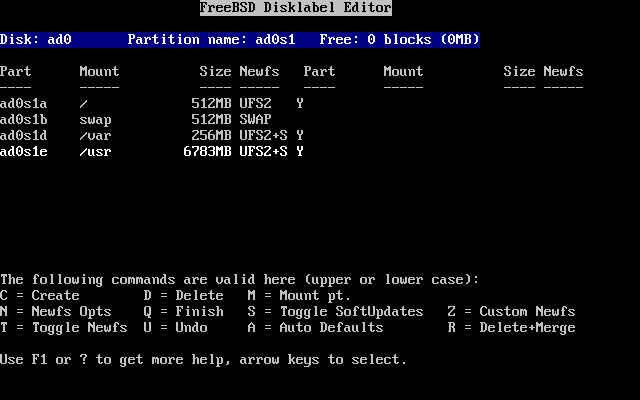
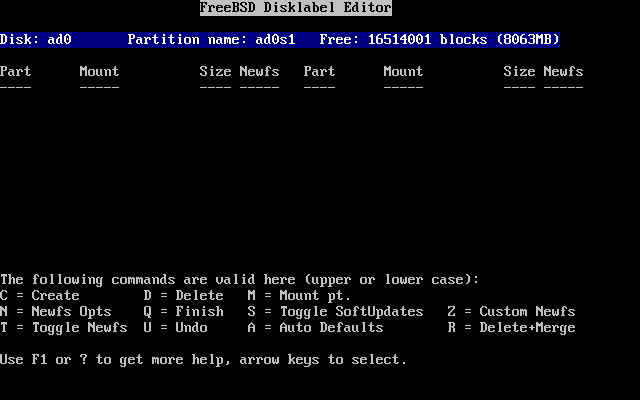
Figure 3.18, “Sysinstall Disklabel Editor” shows the display when Disklabel starts. The display is divided into three sections.
The first few lines show the name of the disk being
worked on and the slice that contains the partitions to
create. At this point, Disklabel
calls
this the Partition name rather than slice
name.
This display also shows the amount of free space within the slice;
that is, space that was set aside in the slice, but that has not yet
been assigned to a partition.
The middle of the display shows the partitions that have been created, the name of the filesystem that each partition contains, their size, and some options pertaining to the creation of the filesystem.
The bottom third of the screen shows the keystrokes that are valid in Disklabel.
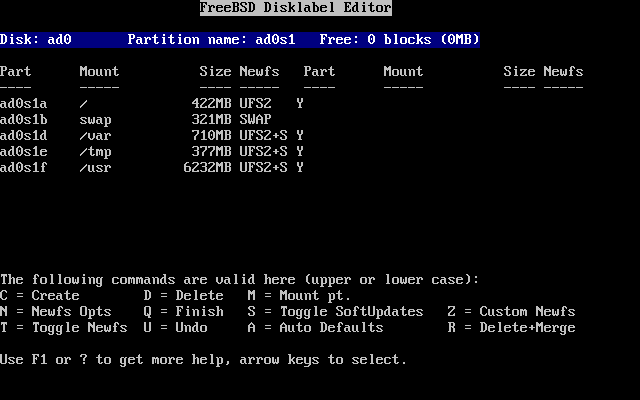
Disklabel can automatically create partitions and assign them default sizes. The default sizes are calculated with the help of an internal partition sizing algorithm based on the disk size. Press A to see a display similar to that shown in Figure 3.19, “Sysinstall Disklabel Editor with Auto Defaults”. Depending on the size of the disk, the defaults may or may not be appropriate.
Note:
The default partitioning assigns
/tmp its own
partition instead
of being part of the / partition. This
helps avoid filling the / partition with
temporary files.
To replace the default partitions, use the arrow keys to select the first partition and press D to delete it. Repeat this to delete all the suggested partitions.
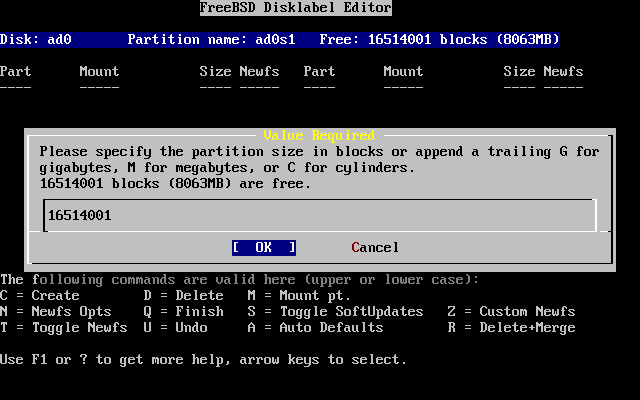
To create the first partition, a,
mounted as
/, make sure the
proper disk slice
at the top of
the screen is selected and press C. A dialog box
will appear, prompting for the size of the new partition,
as shown
in Figure 3.20, “Free Space for Root Partition”. The size can
be entered as
the number of disk blocks to use or as a
number followed by either M for megabytes,
G for gigabytes, or C for
cylinders.
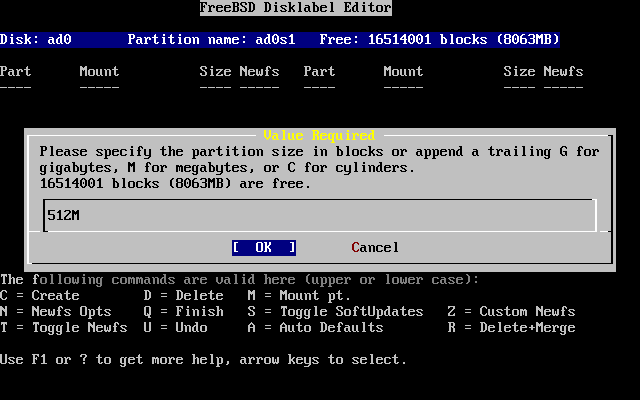
The default size shown will create a partition that takes up the
rest of the slice. If using the partition sizes described
in the earlier example, delete the existing figure using
Backspace, and then type in
512M, as shown in
Figure 3.21, “Edit Root Partition Size”. Then press
.
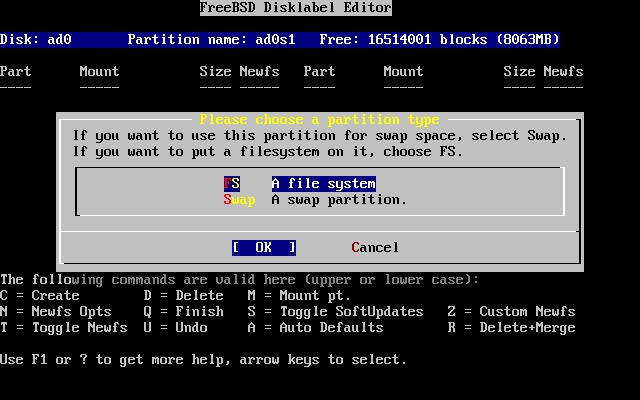
After choosing the partition's size, the installer will ask whether this partition will contain a filesystem or swap space. The dialog box is shown in Figure 3.22, “Choose the Root Partition Type”. This first partition will contain a filesystem, so check that is selected and press Enter.
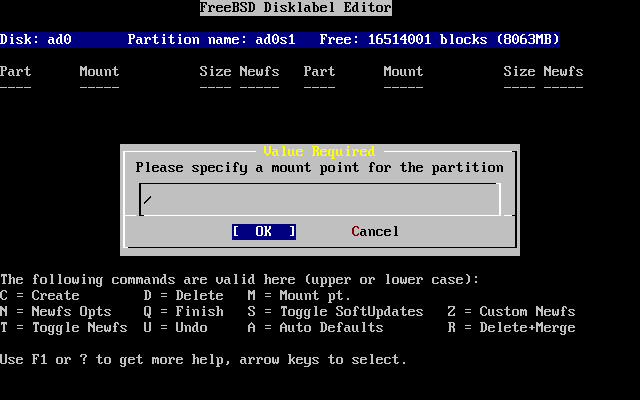
Finally, tell
Disklabel where the filesystem will
be
mounted. The dialog box is shown in
Figure 3.23, “Choose the Root Mount Point”. Type
/, and
then press Enter.
The display will then update to show the newly created
partition. Repeat this procedure for the other
partitions. When creating the swap partition, it will not
prompt for the filesystem mount point. When creating the
final partition,
/usr, leave the
suggested size as is to
use the rest of the slice.
The final FreeBSD DiskLabel Editor screen will appear similar to Figure 3.24, “Sysinstall Disklabel Editor”, although the values chosen may be different. Press Q to finish.